Test Design
Welcome to our fifth Blog, you will see information about Test case design
Software testing is one of the most important phase of a product development. The quality of the product is defined by the amount of testing that is being done on the product. Testing is very much required because of the following reasons,
Software testing is really required to bring the defects and errors to light that were made during the development phases.
Rigoruous testing ensures the quality of the product and thus gaining the trust of the customers and strenthening the relationship which might help in obtaining new projects.
Testing is required for an effective performance of software application on a longer run.
It’s important to ensure that the application should not result into any failures at any point. Because, even a simple failure could cost a bomb for the customers. A good software testing will avoid this problem.
Belaow are the two major testing methods that we have followed to test our money tracker application
Black Box Testing
White Box testing
Black Box Testing
Black-box testing is a method of software testing that evaluates the functionality of an application without examining into its internal structures or workings. This testing can be done by the person who doesn't have coding knowledge.
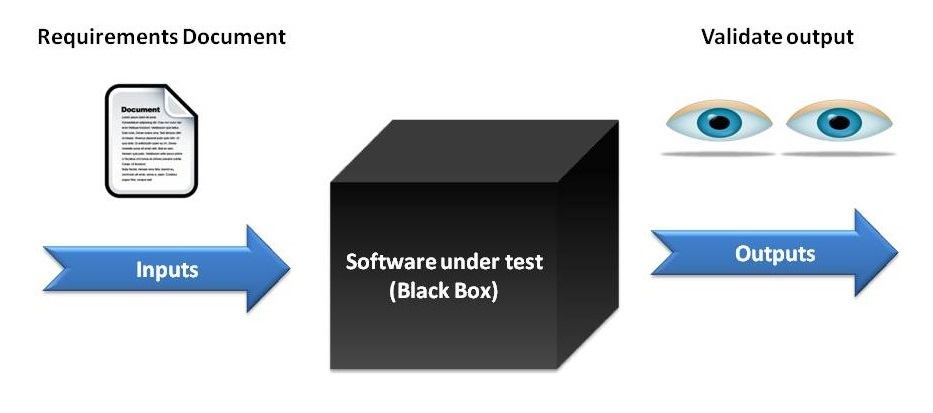
We have taken 5 different functionality and they are as follows,
PIN Verification
Navigation from home screen to Add Transaction/ Settings/ View Report window
Add Transaction
Income and Expense calculation
View Report
1. PIN Verification :

We have four scenarios for PIN verification defined,
Enter of valid PIN of four digit and only number results in Successful Login
Enter Invalid PIN which is not the actual one that was set by the user during his first login, results in authentication failure and user is asked to Re-enter the PIN
Enter PIN (>4 digit), results in failure to login and user is asked to Re-enter the PIN
Enter PIN (<3 digit), results in failure to login and user is asked to Re-enter the PIN
2. Navigation from home screen to Add Transaction/ Settings/ View Report window :

We have four scenarios for navigation across screens from Home screen,
Entry of valid four digit PIN results in Successful Login and is navigated to Home Screen
Click on Add Transaction (+) icon, user will be navigated to Add Transaction window
Click on Settings icon(right corner), user will be navigated to Settings window
Click on View Report icon (left corner), user will be navigated to View Report window
3. Add Transaction :

We have six scenarios for adding transaction, data values amount, date, category and payment method being mandatory fields whereas note and recurring transaction is optional. Transaction is successful when this criteria is fulfilled else fails
First three scenario fails as mandate fields are not filled and hence adding a transaction is not sucessful. In this case,the user will be notified to enter all mandate fields
4th and 5th scenario is filled with all mandatory fields and hence transaction is successfully added
6th scenario deals with the adding of new category on adding Transaction, in this case user clicks on Add New Category link and adds new category which will be preselected in category list once its added and transaction is successfully added
4. Income and Expense calculation :
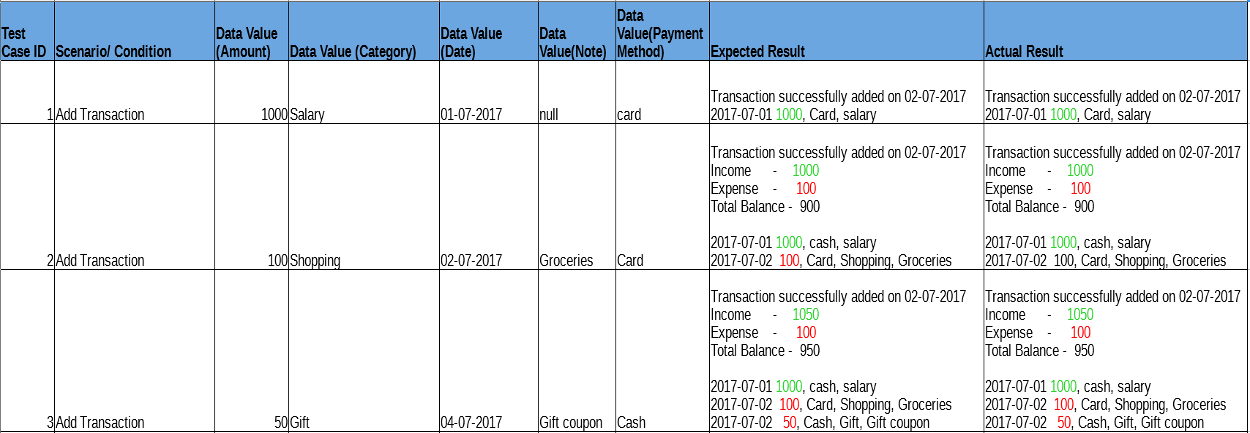
We have three scenarios for showing calculations involved, with respect to the transactions added
Initially Income is added as shown (1000 euros) , So here Income - 1000 and expense - 0 which is missing in the above table
In the second scenario, expense of 100 euro is added and hence total balance is calculated which is 900 euros deducted from income which was added as 1000 euros previously
In 3rd scenario again 50 euro is added under income hence its computed to result in Income - 1050 euros, expense - 100 euros and Total Balance - 950 euros
5. View Report :

We have five scenarios showing possible combinations with which report can be viewed, we basically have three filters
Filter by date - Date range is specified and transactions within this range are shown to the user
Filter by category - Select category (can be single/multi select)and transactions of this category type are only shown
Filter by payment - Select payment method and transactions of selected payment method are only shown
First scenario involves no filters applied and hence all the transactions will be displayed
From and To date are specified and transactions of this date range will be displayed, if only From or To is selected then user is notified to select the From or To date
In 3rd scenario category is selected and transactions for that particular category is displayed
In 4th scenario payment method is selected and transactions for that particular payment type is displayed
In 5th scenario multiple filters are applied and result based on those filters will be displayed
White Box Testing
If we go by definition, “White box testing” (also known as clear, glass box or structural testing) is a testing technique which evaluates the code and internal structure of the program. The tester chooses inputs to exercise paths through the code and determines the appropriate outputs.
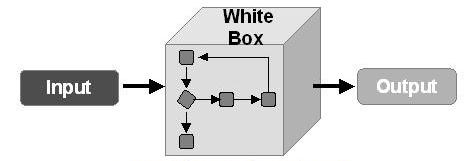
Following are the white box test cases
1. LoginActivity :

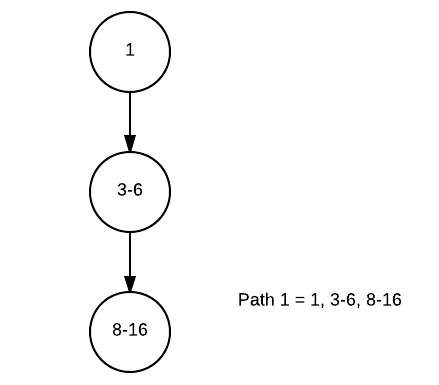
Shows the statement coverage, this is the simplest of all. We have considered an example of Login component. All variables are initialised, Oncreate function is called during beginning of the Login Activity and later entered values in EditText fields are captured and finally stored in DB. Here every single statement is reachable and executed.
2. Verify PIN :

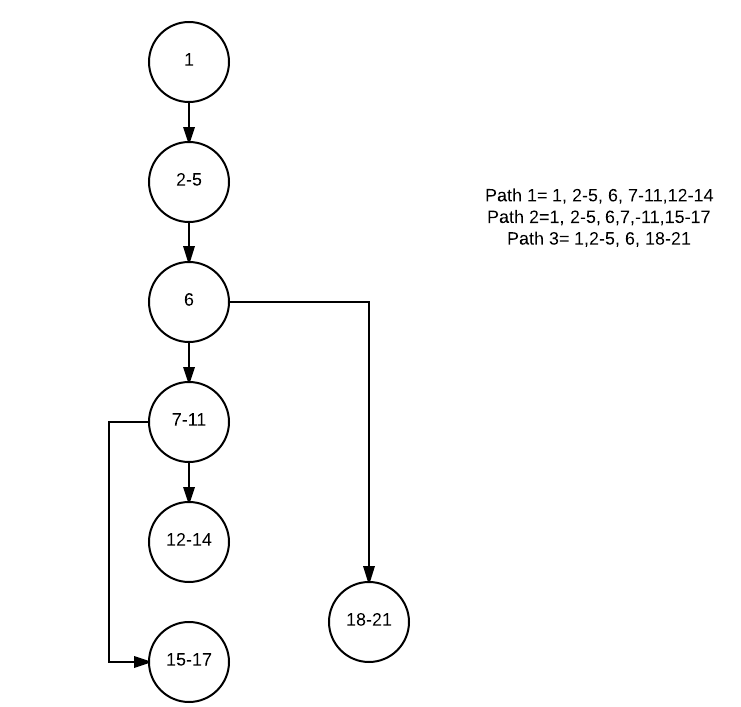
Shows the statement coverage, here it can follow three different paths as shown and covers all statements at least once, Path 1 executes till 6th line, if entered and re-entered PIN are same then it executes line 7-11 and then if pin is updated in DB it executes line 12-14 Path 1 executes till 6th line, if entered and re-entered PIN are same then it executes line 7-11 and then if pin is not updated in DB it executes line 15-17 Path 3 executes till 6th line, if entered and re-entered PIN are not same then it executes line 18-21
3. Income and Expense selection :
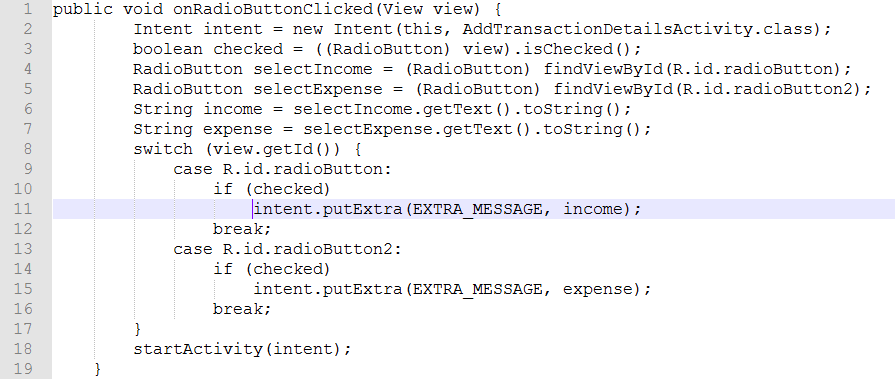
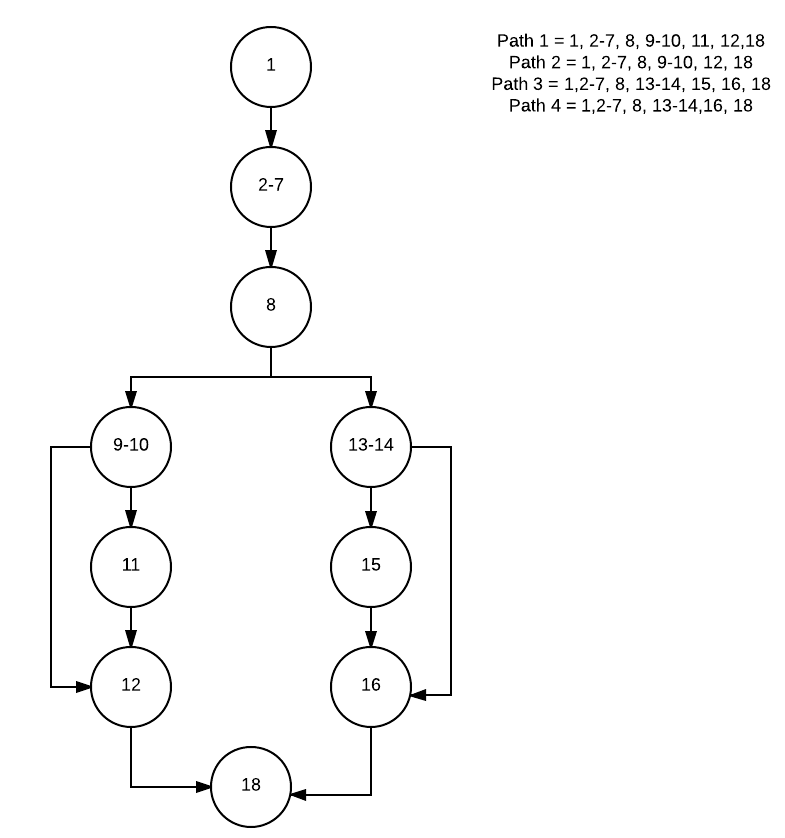
Shows the branch coverage, here it can follow four different paths and for every conditional statement both branches are executed, Each path deviates at line 8 based on selected radio option, Income/Expense if Income is selected then it takes path 1 or 2 If expense is selected then it takes path 3 or 4
4. Add Transaction and New Category :
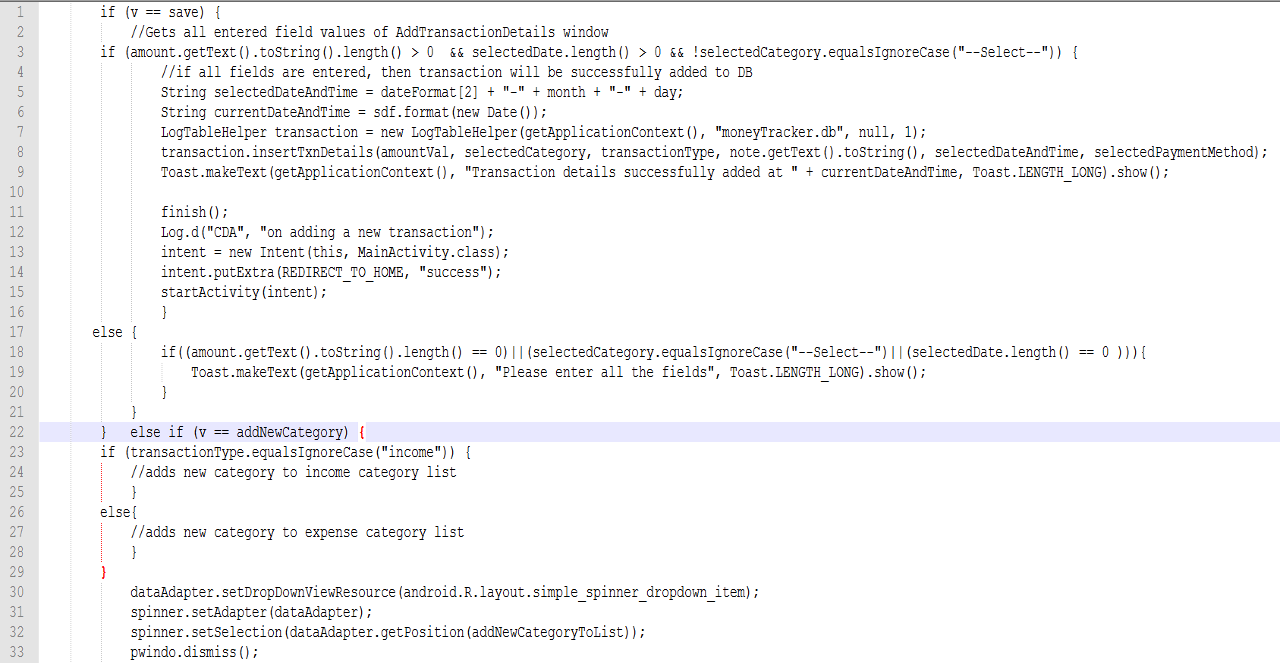
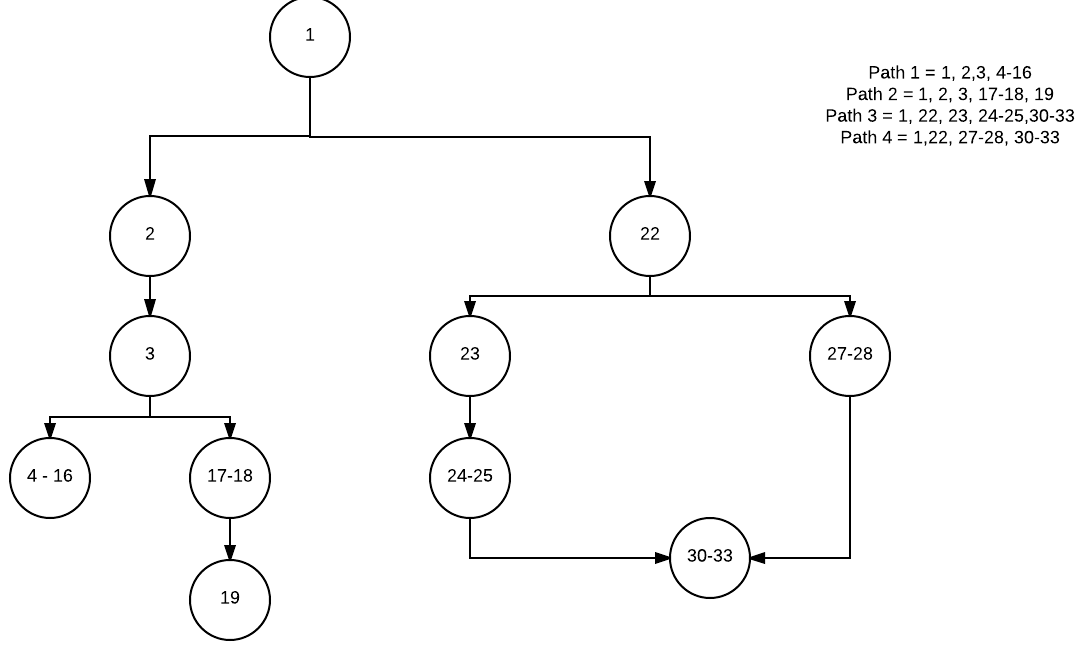
Shows the branch coverage, here it can follow four different paths and for every conditional statement both branches are executed. All enetered value in Add transaction window is read. If save is clicked then it takes path 1 and 2 Path 1 results in successful tansaction path 2 results in notifying user to enter all the mandatory fields If Add New Category is clicked then path 3 and 4 is executed Path 3 results in adding category to income category list Path 4 results in adding category to expense category list
5. Report :
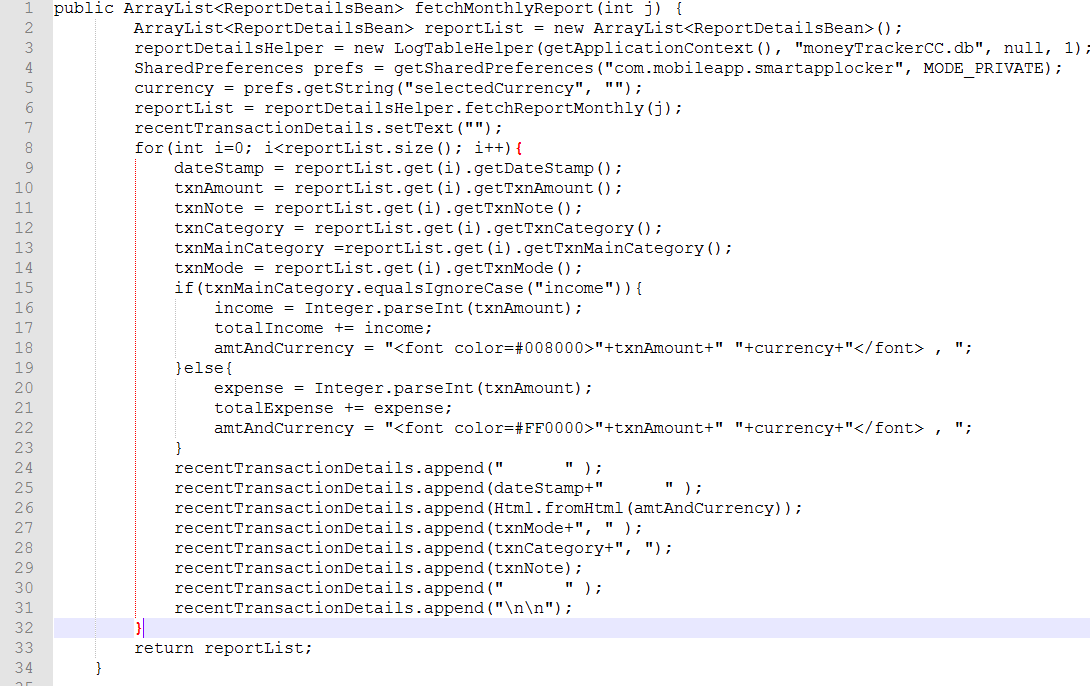

Shows the path coverage, sequence of statements are repaeatedly executed finite number of times. Here statements between 9 to 32 is executed n-times(n being size of report list) based on transaction type being Income or Expense it is switched to either to execute 16-18 or 19-23 and then continues to execute line 24-32. After completion of loop line 33 is executed, hence covering all the statement.
Summary of changes
After clarifying with the customer we made few changes. Below are the key changes to our requirements.
Multiselect of Category in view report, this allows user to select more than one category to view his transaction corresponding to the categories
Recurring Transaction functionality was added, this allows user to specify transaction to add repeatedly for next 3/ 6 months on the specified date while adding a transaction. For example Salary is recurring transaction every month.
Showcasing Income and expense with green and red color respectively, this allows user to distinguish between the Income and expense easily
Addition of + and - for the amount field in Add Transaction window based on Income / Expense selected. This allows user to have an idea of what type of transaction he/ she is gonna add
Displaying the overall balance on the report screen based on the applied filters
Displaying total income and expense along with monthly income and expenses for the selected month(Previous, Current and Next month) on the home screen