Welcome to our fifth blog, hope you enjoyed our previous blogs!!. In this blog we will discuss in detail about the test case design for Black box testing and White Box testing for our application and finally last but not the least about the summary of changes.
Black Box Testing:
Black box Testing is the testing either functional or nonfunctional without reference to the internal structure of the component or system.
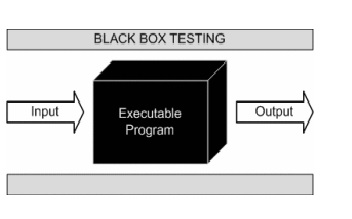
This method attempts to find the errors in the following categories:
- Incorrect or missing functions.
- Interface Errors.
- Errors in data structures or External database access.
- Behavior or performance errors.
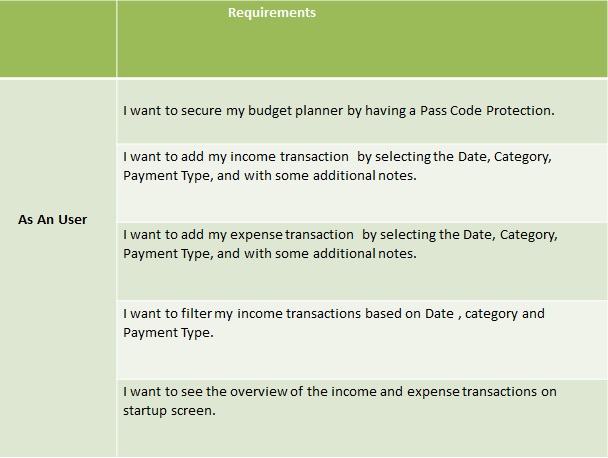
The following table shows the five functional requirements which are being considered to perform Black Box Testing
Requirement-1:
As a user I want to secure my budget planner with the passcode.
Testcase-1:
Title: Log In Activity: Authentication of the user
Description: A registered user (i.e.after setting a passcode for the application) should be able to successfully login by entering the passcode.
Precondition: User must already had set the passcode
Testing Steps:
- Open the Money management Application.
- In “Enter Passcode” field Enter the registered passcode.
- Click Login Button.
Expected Result:
- User should be able to login successfully, if the entered passcode matches with the registered passcode.
- If the Entered passcode does not match with the registered passcode an error message should be shown “wrong password”.
Requirement-2:
I want to add my income transaction by selecting the Date, Category, Payment Type, and with some additional notes (optional).
Testcase-2:
Title: Income Transaction: Addition of new income transaction by the user.
Description: A registered user should be able to successfully add a new income transaction by choosing the date, category, payment method and with additional notes (optional).
Precondition: User has logged in successfully.
Testing Steps:
- Open the Money Management Application.
- Log in using the Passcode.
- Click on the income icon on the startup screen to navigate to the income activity screen.
- Select desired Date, Category and Payment Type. (Mandatory).
- Enter the amount.
- Add additional notes for the transaction if required. (optional).
- Click AddIncome Button.
Expected Result:
- New income transaction should be added successfully to the database.
- This can be verified by clicking ViewIncome Button.
Requirement-3:
As a user I want to add my expense transaction by selecting the Date, Category, Payment Type, and with some additional notes (optional).
Testcase-3:
Title: Expense Transaction: Addition of new income transaction by the user.
Description: A registered user should be able to successfully add a new expense transaction by choosing the date, category, payment method and with additional notes (optional).
Precondition: User has logged in successfully.
Testing Steps:
- Open the Money Management Application.
- Log in using the Passcode.
- Click on the expense icon on the startup screen to navigate to the income activity screen.
- Select desired Date, Category and payment Type. (Mandatory).
- Enter the amount.
- Add additional notes for the transaction if required. (optional).
- Click AddExpense Button.
Expected Result:
- New expense transaction should be added successfully to the database.
- This can be verified by clicking ViewExpense Button.
Requirement-4:
As a user I want to filter my income transaction by selecting the dates, Category and payment type.
Testcase-4:
Title: Filter Transaction: Filter the income based on Date range , category and Payment method.
Description: A registered user should be able to successfully Filter the income based on Date range, category and Payment method.
Preconditions:
- User has logged in successfully.
- Income transactions have been added to the database.
Testing Steps:
- Open the Money management Application.
- Log in using the passcode.
- Click on the menu icon on the start up screen.
- Click on the settings and then Click on the filter Income Button.
- Choose the from date and To date from the calendar pop up to filter based on dates.
- Choose category and payment method on which the user wants to filter the income transaction.
- Click Filter Income Button.
Expected Result:
- Once the Filter Income Button is clicked, the popup should show up displaying the income transactions according to the selected dates and category and payment type.
Requirement-5:
As a user I want to see the overview of Income/Expense Transactions on the start up screen.
Testcase-5:
Title: Transaction Overview
Description: A registered user should be able to see the overview of income and expense transactions on the start up screen on click of a button.
Precondition:
- User has logged in successfully.
- Income transactions have been added to the database.
- Expense transactions have been added to the data base.
Testing Steps:
- Open the Money management Application.
- Log in using the passcode.
- Click on the Income Overview Button on the startup screen to see the income transactions overview.
- Click on the Expense Overview Button on the startup screen to see the expense transactions overview.
Expected Result:
- Once the Income Overview Button is clicked, the popup should show up displaying the income transactions which are successfully added to the database.
- Once the Expense Overview Button is clicked, the popup should show up displaying the expense transactions which are successfully added to the database.
White Box Testing:
White Box testing refers to a scenario where the tester deeply understands the inner workings of the component and its implementation.
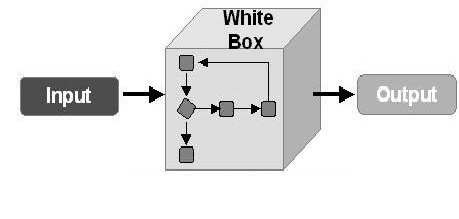
The key Principles which assist in executing White Box tests successfully are:
- Statement Coverage- Ensure every single line of code is tested.
- Branch Coverage- Ensure every branch (eg: true or false) is tested.
- Path Coverage – Ensure all possible paths are tested.
Flow charts help us to identify the possible branches and conditions to achieve maximum amount of code coverage.
The following Table shows the five functional requirements which are considered for the white Box Testing and the corresponding classes covered.
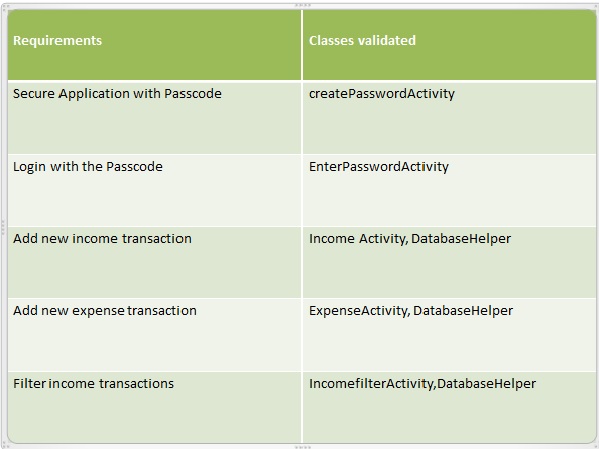
Test cases have been selected to achieve maximum code coverage in each functional blocks.
Requirement-1:
Secure Application with Passcode.
The flow chart shows the all possible Paths and Test Scenarios.
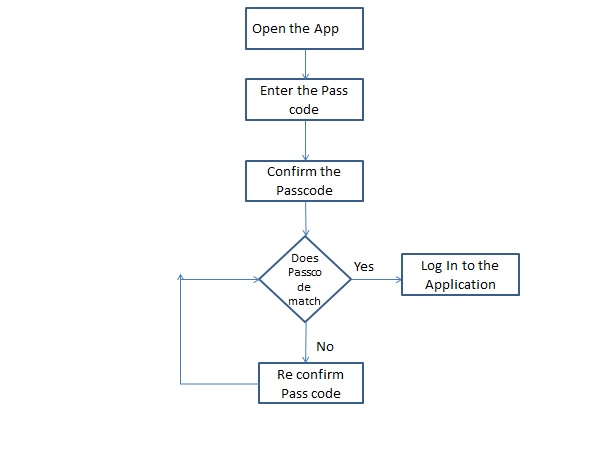
Testcase-1:
Title: Create Passcode
Testing Steps:
- Open the Money management Application.
- In “Enter Passcode” field Enter the passcode.
- In “Confirm Passcode” field Enter the same passcode again.
- Click Login Button.
Expected Result:
- User should be able to login successfully, if the passcode entered in In “Enter Passcode” and “Confirm Passcode” field matches.
Testcase-2:
Title: Confirm Passcode
This test case is added to cover all if else condition statements in CreatePassword.
Testing Steps:
- Open the Money management Application.
- In “Enter Passcode” field Enter the passcode.
- In “Confirm Passcode” field Enter the different passcode.
- Click Login Button.
Expected Result:
- An error message should be shown saying Passcode Does not match.
Requirement-2:
Login with the Passcode
The flow chart shows the all possible Paths and Test Scenarios.
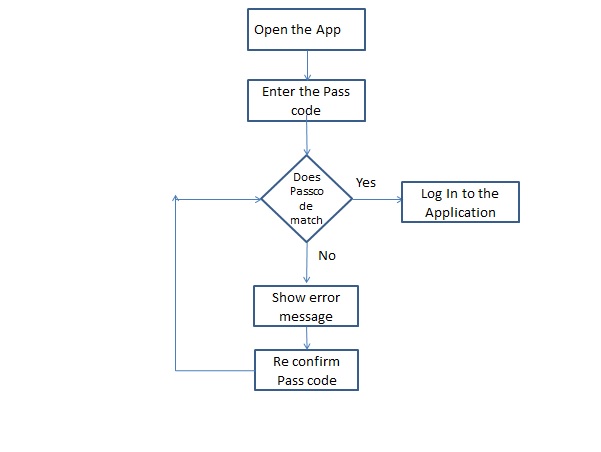
Testcase-1:
Title: LogIn Activity
Precondition: User had already set the passcode.
Testing Steps:
- Open the Money management Application.
- In “Enter Passcode” field Enter the passcode.
- Click Login Button.
Expected Result:
- User should be able to login successfully, if the passcode entered in In “Enter Passcode” matches with the passcode registered by the user.
Testcase-2:
Title: Validate Passcode.
This test case is added to cover all if else condition statements in EnterPassword Class.
Precondition: User had already set the passcode.
Testing Steps:
- Open the Money management Application.
- In “Enter Passcode” field Enter the different passcode than the registered passcode.
- Click Login Button.
Expected Result:
- An error message should be shown saying Wrong Passcode.
Requirement-3:
Add new income transaction
The flow chart shows the all possible Paths and Test Scenarios.
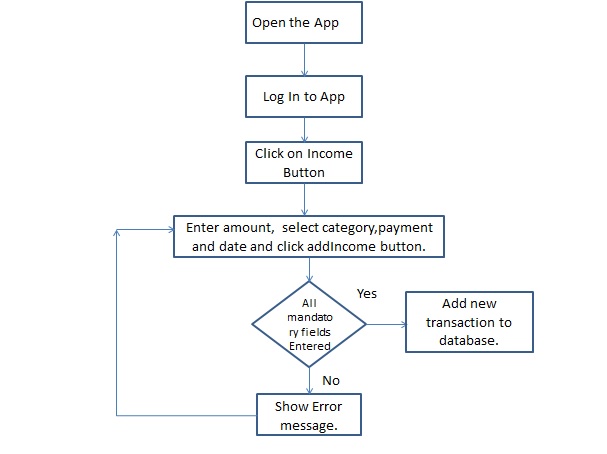
Testcase-1:
Title: Income transaction.
Precondition: User has logged in successfully.
Testing Steps:
- Open the Money management Application.
- Log in to the app using passcode.
- Click on Income Button on Start screen to navigate to income activity page.
- Enter amount and select date , category and payment type.( mandatory).
- Add additional notes (optional).
- Click Addincome button.
Expected Result:
- New income transaction should be added successfully to the database.
Testcase-2:
Title: Validate mandatory fields.
This test case is added to cover all if else condition statements in IncomeActivity Class.
Precondition: User has logged in successfully.
Testing Steps:
- Open the Money management Application.
- Log in to the app using passcode
- Click on Income Button on Start screen to navigate to income activity page.
- Enter amount, select date and click on add income button.
- Enter amount, select category and click on add income button.
- Enter amount, select payment type and click on add income button.
Expected Result:
1.An Error message should be shown saying “ please select all mandatory fields”.
Requirement-4:
Add new expense transaction.
The flow chart shows the all possible Paths and Test Scenarios.
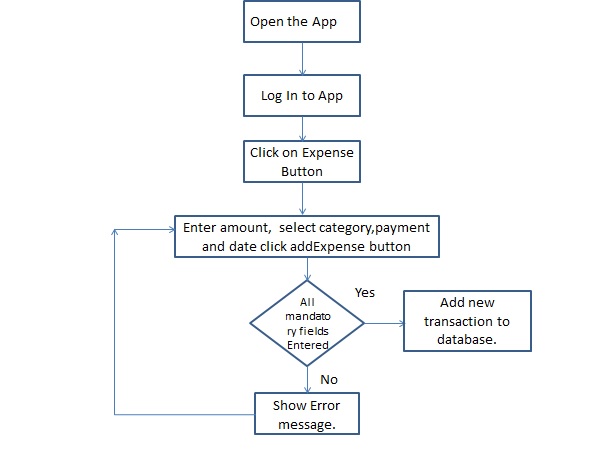
Testcase-1:
Title: Expense transaction.
Precondition: User has logged in successfully.
Testing Steps:
- Open the Money management Application.
- Log in to the app using passcode.
- Click on Expense Button on Start screen to navigate to expense activity page.
- Enter amount and select Date , category and payment type.( mandatory).
- Add additional notes (optional).
- Click Add Expense button.
Expected Result:
- New Expense transaction should be added successfully to the database.
Testcase-2:
Title: Validate mandatory fields.
This test case is added to cover all if else condition statements in ExpenseActivity Class.
Precondition: User has logged in successfully.
Testing Steps:
- Open the Money management Application.
- Log in to the app using passcode.
- Click on Expense Button on Start screen to navigate to expense activity page.
- Enter amount, select date and click on addExpense button.
- Enter amount, select category and click on addExpense button.
- Enter amount, select payment type and click on addExpense button.
Expected Result:
1.An Error message should be shown saying “ please select all mandatory fields”.
Requirement-5:
Filter Income Transactions.
The flow chart shows the all possible Paths and Test Scenarios.
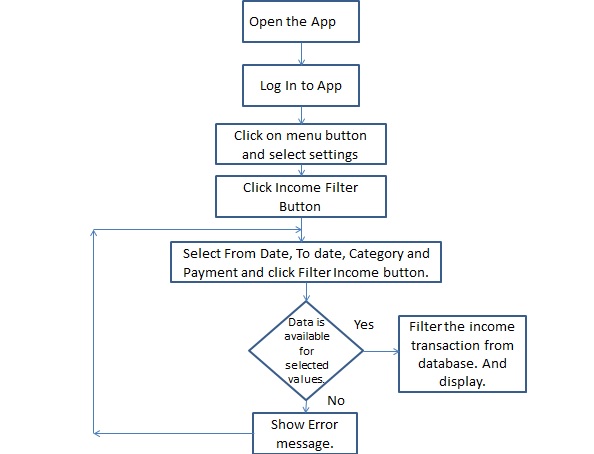
Testcase-1:
Title: Filter transactions.
Precondition:
- User has logged in successfully.
- Atleast one income transaction is added to the database.
Testing Steps:
- Open the Money management Application.
- Log in to the app using passcode.
- Click on Menu button on start screen and select settings.
- Click on “Income Filter” button to navigate to income filter page.
- select from Date and To date form the calendar popup.
- select payment Type and category.
- Click “Filter Income” button.
Expected Result:
- Income transactions should be displayed according to the selected date range, category and payment type.
Testcase-2:
Title: Filter transactions.
Precondition:
- User has logged in successfully.
- Atleast one income transaction is added to the database.
Testing Steps:
- Open the Money management Application.
- Log in to the app using passcode.
- Click on Menu button on start screen and select settings.
- Click on “Income Filter” button to navigate to income filter page.
- select from Date and To date form the calendar popup and Click “Filter Income” button.
- select payment Type and Click “Filter Income” button.
- select Category and Click “Filter Income” button.
Expected Result:
- For all the above cases Income transactions should be displayed according to the selected date range, category and payment type.
Summary of Changes:
There has been a change in our implementation of Displaying the transaction oververview. The tansaction overview will be displayed as a popup instead of list view.
That is all for now !
Thank You for visiting our fifth blog!! Stay tuned for our next blog.