Testing
The purpose of testing is to discover errors. Testing is the process of trying to discover every conceivable fault or weakness in a work product. It provides a way to check the functionality of components, subassemblies, assemblies and/or a finished product. It is the process of exercising software with the intent of ensuring that the Software system meets its requirements and user expectations and does not fail in an unacceptable manner. There are various types of tests available,In this blog article we considered black box and white box testing techniques for our mobile application
|
Type of Testing
|
White-box Testing |
Black-box Testing
|
|
Tester visibility |
have visibility to the code and write test cases based upon the code |
have no visibility to the code and write test cases based on possible inputs and outputs for functionality documented in specifications and/or requirements |
|
A failed test case reveals |
a problem (fault) |
a symptom of a problem (a failure)
|
|
Is it Controlled? |
Yes – the test case helps to identify the specific lines of code involved |
No – it can be hard to find the cause of the failure |
White Box Testing
White box testing encompasses several testing types used to evaluate the usability of an application, block of code or specific software package. One of them is listed below:
Unit Testing : It is often the first type of testing done on an application. Unit testing is performed on each unit or block of code as it is developed.
Unit testing is essentially done by the programmer. As a software developer, you develop a few lines of code, a single function or an object and test it to make sure it works before continuing
Unit testing helps identify majority of bugs, early in the software development lifecycle. Bugs identified in this stage are cheaper and easy to fix.
Some of the test cases performed on the spür application are mentioned below:
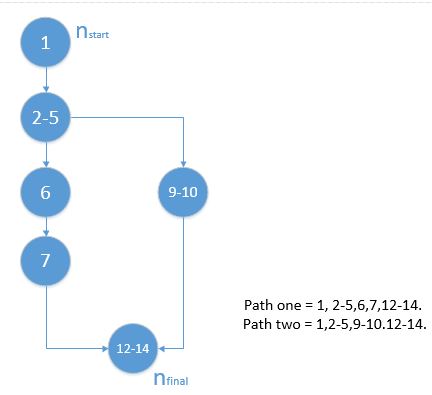
Test case 1: Setting PIN
Type: branch coverage in class SetPinFunction
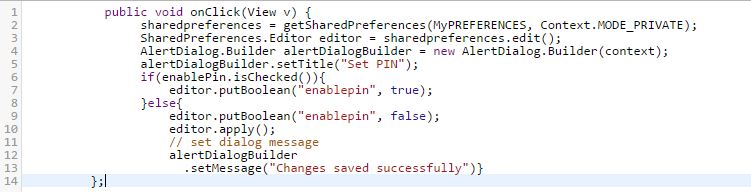
The above code represents the activity of enabling and setting the PIN in the set pin activity class. After enabling the PIN , the user will have to set it . After setting the pin one can choose whether to enable it or not. Based on the selected option the paths are derived in the blew flow chart.Id the user takes the decision enable pin= true, then the message “changes saved successfully” displayed. Else path from 9 will be executed
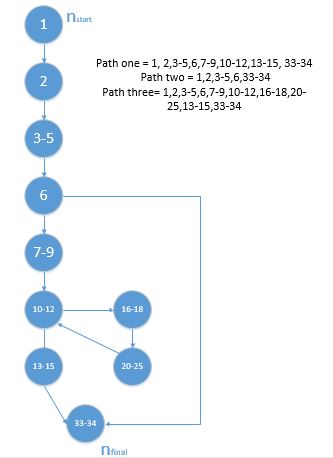
Test case 2: Login PIN verifying
Type: Branch coverage in class LoginFunction
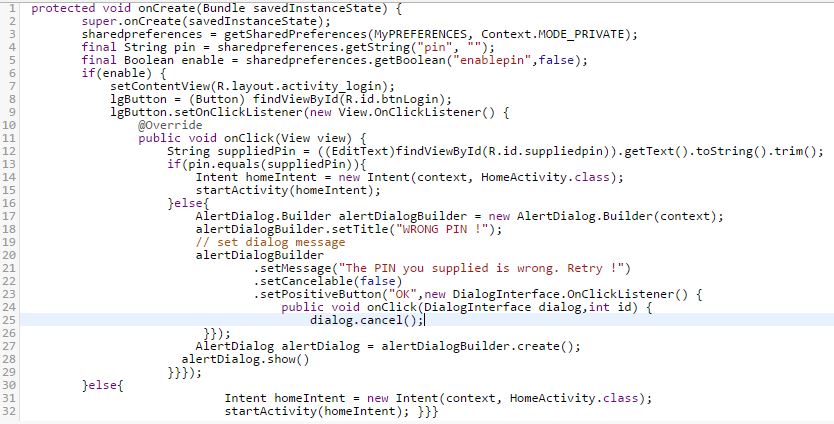
In this test case the path flow in three different ways. If initially a PIN is disabled it follows the path three else it will choose to follow the path one or two as shown in the below picture.
Test case 3: Adding new category
Type: statement coverage for class CategoryFunction
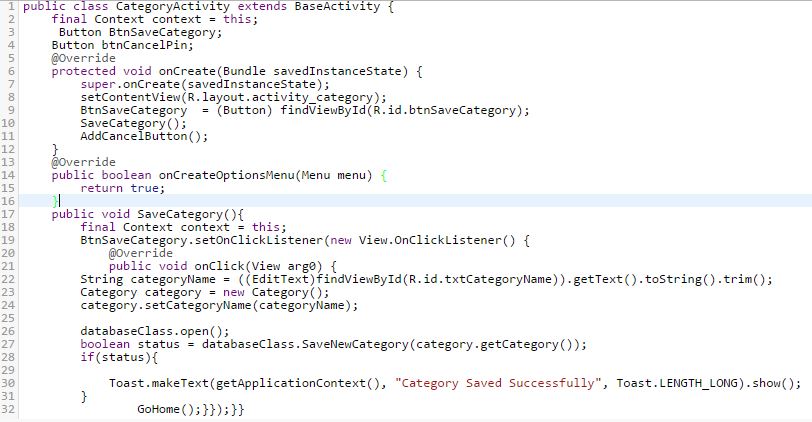
Statement coverage is a measure of the percentage of statements that have been executed by test cases. Here for the class ”CategoryActivity”. After creating a new category the save category button is clicked and the new category is saved in the database class. Once a new category is saved in database context is shown as “category saved successfully”.
Test case 4: Filtering Transactions
Type: Branch coverage in the class TransactionFunction
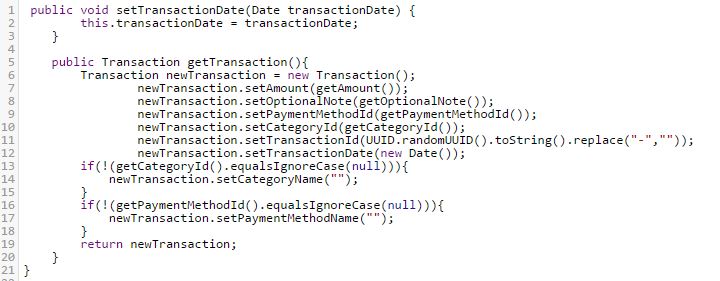
In this test case the transactions are filtered by selecting various categories like amount,optional note, payment method, category ID, transaction ID and transaction date. If the values in the category ID or payment method ID are null the new transaction is returned.
Test case 5:
Type: statement coverage in class DatePickerFragmentActivity
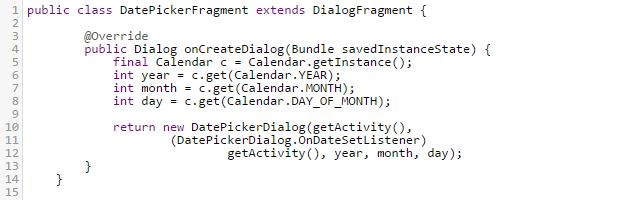
In this test case datepicker fragment is testet.. I.e., selection of the transaction date if the income and expense page.Initially the current date is represented, if the user wants to change the default date. The user can select the year, month and date from the pop up calendar on the screen. The selected date restored in the previous date
Black-box Testing
Black Box Testing is testing the software without any knowledge of the inner workings, structure or language of the module being tested. Black box tests, as most other kinds of tests, must be written from a definitive source document, such as specification or requirements document, such as specification or requirements document. It is a testing in which the software under test is treated, as a black box .you cannot “see” into it. The test provides inputs and responds to outputs without considering how the software works.
Some of the test cases conducted in the black box testing are mentioned below:
|
Test Case ID |
No of Steps |
Description |
Expected Results |
Actual Results |
Pass/Fail |
|
1.0 |
Equivalence class test cases for login PIN |
||||
|
Step 1 |
Maximum 4 integers valid-PIN / available in database |
PIN accepted |
PIN accepted |
PASS |
|
|
Step 2 |
Maximum 4 integer valid-id / not available in database |
Please enter valid PIN |
Please enter valid PIN |
PASS |
|
|
Step 3 |
PIN with characters |
Please enter valid PIN |
Please enter valid PIN |
PASS |
|
|
Step 4 |
PIN left blank |
Please enter PIN |
Enter PIN |
PASS |
|
|
Step 5 |
PIN with special characters in between |
Please enter valid PIN |
Please enter valid PIN |
PASS |
|
|
2.0 |
Application opening |
||||
|
Step 1 |
Open app in the android phone |
The dashboard screen should be displayed with Budget Planner displayed in the header with recent transaction in the bottom |
The dashboard screen should be displayed with Budget Planner displayed in the header with recent transaction in the bottom |
PASS |
|
|
3.0 |
Add income |
||||
|
Step 1 |
Click on income icon to navigate to Amount spent page |
The user should be able to view the Amount spent pop up box |
The user clicks on ↓ and is able to view the Add amount spent pop up box |
PASS |
|
|
Step 2 |
The user enters the description and the amount spent |
The user should be able to enter the amount earned description, amount and select date of transaction |
The user enters the amount earned, description and also selects the date of transaction |
PASS |
|
|
Step 3 |
The user clicks ok and the amount is entered |
The user should be able to see the amount earned after clicking ok |
The user clicks ok and is able to see the amount earned |
PASS |
|
|
4.0 |
Adding expense |
||||
|
Step1 |
Click on expense icon navigate to amount spent page |
The user should be able to view the Amount spent pop up box |
The user clicks on expense icon and able to view the Add amount spent pop up box |
PASS |
|
|
Step 2 |
The user enters the description and the amount spent |
The user should be able to enter the amount earned description and the amount |
The user should be able to enter the amount spent description and the amount |
PASS |
|
|
Step 3 |
The user clicks ok and the amount is entered |
The user should be able to see the amount spent after clicking ok |
The user clicks ok and is able to see the amount spent details |
PASS |
|
|
5.0 |
Adding new categories |
||||
|
Step 1 |
Go to the navigation icon and Click the add categories to budget screen |
The user should be able to save new category by clicking save button in that page |
The user should be able to save new category by clicking save button in that page |
PASS |
|
Changes done so far
- Removed the pop up (Set your PIN) message at the beginning of the application after discussíng with our customer
- Added a option to change the default currency which is dollar.