Advanced Prototype
Welcome to our fifth blog, we will introduce our Advanced Prototype and discuss the design pattern, coding conventions and the context of use in this blog.

Advanced Prototype
In this blog, we will introduce our Advanced Prototype and discuss the design pattern, coding conventions and the context of use. The changes from the Basic Prototype to the Advanced Prototype will also be stated.
Design Pattern
We have utilized three design patterns in our project.
MVC Design Pattern
Model View Controller is more of a architecture pattern than design pattern. We divided our classes into Model, View and Controller layers. In Model Layer all the classes that were discussed in previous blogs will fall into e.g. HistoryActivity where all the transactions are saved. They have all the core functionalities of the app within them and how data is stored and managed. In Controller Layer we have classes in our application that usually extend Activity or Fragment class provided by the Android Library. One such example is DBHandler class which is extending the HistoryActivity. These classes manage the interaction between the User Interface (View Layer) and the Model Layer. In our application these classes usually extend Activity or Fragment class which are provided by Android libraries. In the View Layer we have classes that were already provided by the Android libraries that we used. More information about them can be found here.
Adapter Design Pattern
Adapter pattern works as a bridge between two incompatible interfaces. This type of design pattern comes under structural pattern as this pattern combines the capability of two independent interfaces. It involves a single class which is responsible to join functionalities of independent or incompatible interfaces.
In our application we used list adapter in TranAddFragment.java, TranDetailFragment.java, and TranMenuFragment.java. These fragments refer to the transaction data from the database and show them on list view.
Observer Design Pattern
Observer pattern is used when there is one-to-many relationship between objects such as if one object is modified, its depenedent objects are to be notified automatically. Observer pattern falls under behavioral pattern category. Observer pattern uses three actor classes. Subject, Observer and Client. In our project, we implemented this design pattern in IncomeActivity.java and TransactionActivity.java.
Coding Conventions
Coding conventions are a set of guidelines for a specific programming language that recommends programming style, practices, and methods for each aspect of a program written in that language. Not only does it make the program well organized but it also makes it a lot easier to work with.
Coding conventions are important to programmers for a number of reasons: 40%–80% of the lifetime cost of a piece of software goes to maintenance. Hardly any software is maintained for its whole life by the original author. Coding conventions improve the readability of the software, allowing engineers to understand new code more quickly and thoroughly.
As a team we had to make sure that our application is well packaged and clean. And for this we set the Google Java Style Guide as our reference. This includes the follows things:
1. Source file names:
All the class and interface files must end with .java extension.
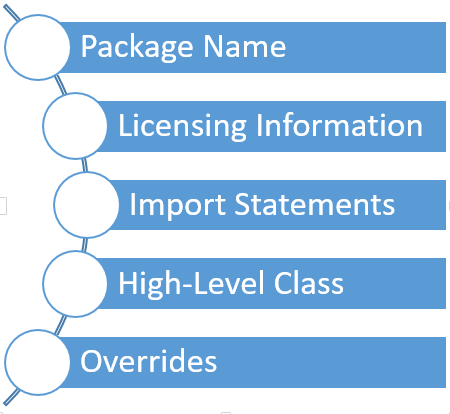
2. Source file structure: All the source files should have the structure as depicted below
3. Comments: All the source files must have comments for each section.
4. Variable declarations: Every variable declaration should have only one variable and local variables are declared close to the point they are first used and are typically initialized immediately after declaration.
5. Annotations: Every annotation must appear right after the comment block and before the corresponding class or method. There should be only one annotation per line.
6. Naming Conventions
-
Java Classes/Interfaces:
UpperCamelCase.java -
Activity Java Files :
UpperCamelCaseActivity.java -
Activity Layout Files :
activity_lowercase_name.xml -
Fragment Files :
fragment_lowercase_name.xml -
Menu Files :
menu_lowercase_name.xml -
Method Names :
lowerCamelCase -
Constants :
UPPER_CASE -
Variables :
lowercase_name
These Coding Conventions can be seen in the screenshots below:


Context of use
Whether you’re developing a smartphone app or a mobile-responsive website, it’s very important to understand who will be using the product. In order to solve a real user problem, you need to have a clear problem statement in mind; and in order to write this problem statement, you first need to understand your users and their needs. So with that in mind, understanding the needs of our users is vital for developing a successful product because well-defined personas will enable us to efficiently identify and communicate user needs. These personas will also help us describe the individuals who use our product, which is essential to our overall value proposition.
We tried to answer the following questions to know more about our target audience:
-
Who is my ideal customer?
-
What are the current behaviour patterns of our potential users?
-
What are the needs and goals of our potential users?
-
What issues and pain-points do they currently face within the given context?
For this instance we created two personas - Felix and Emily, each indicating two different target user groups.
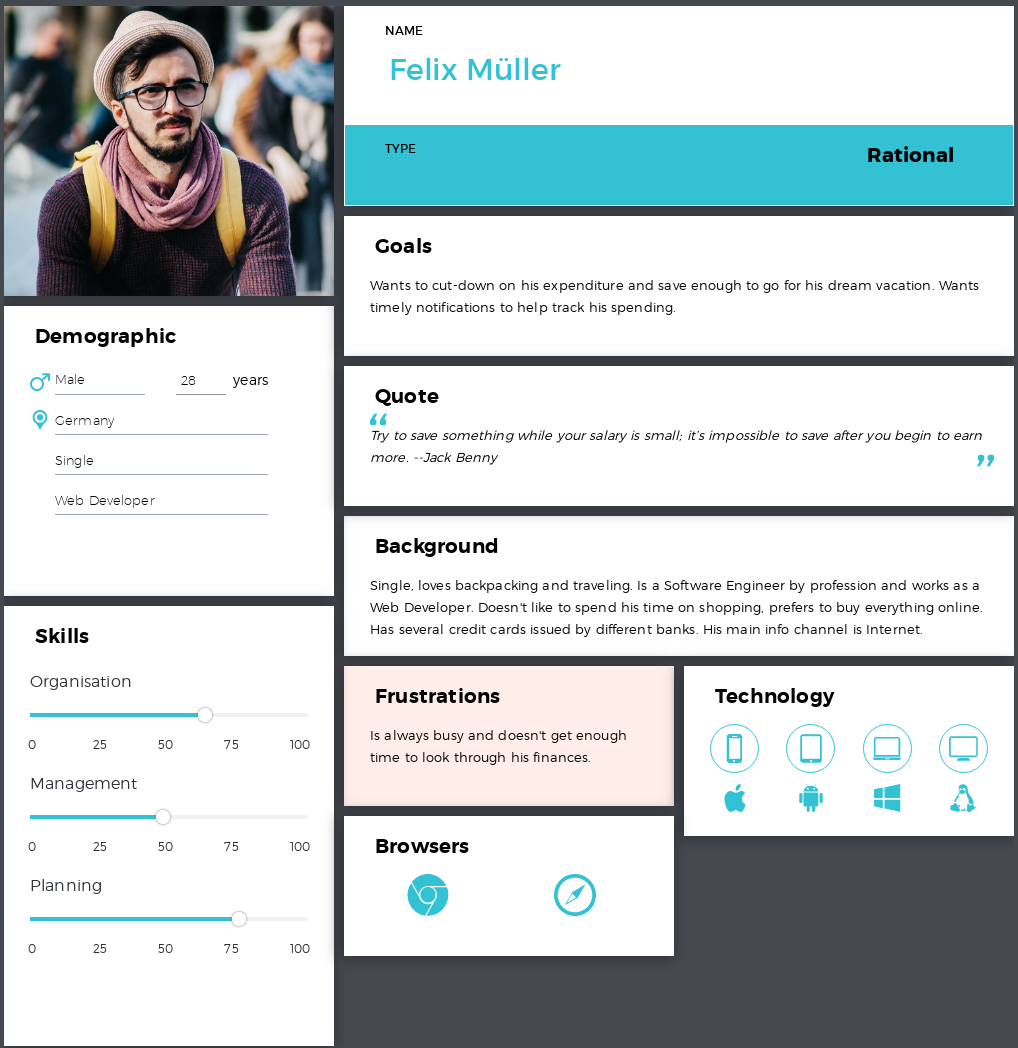
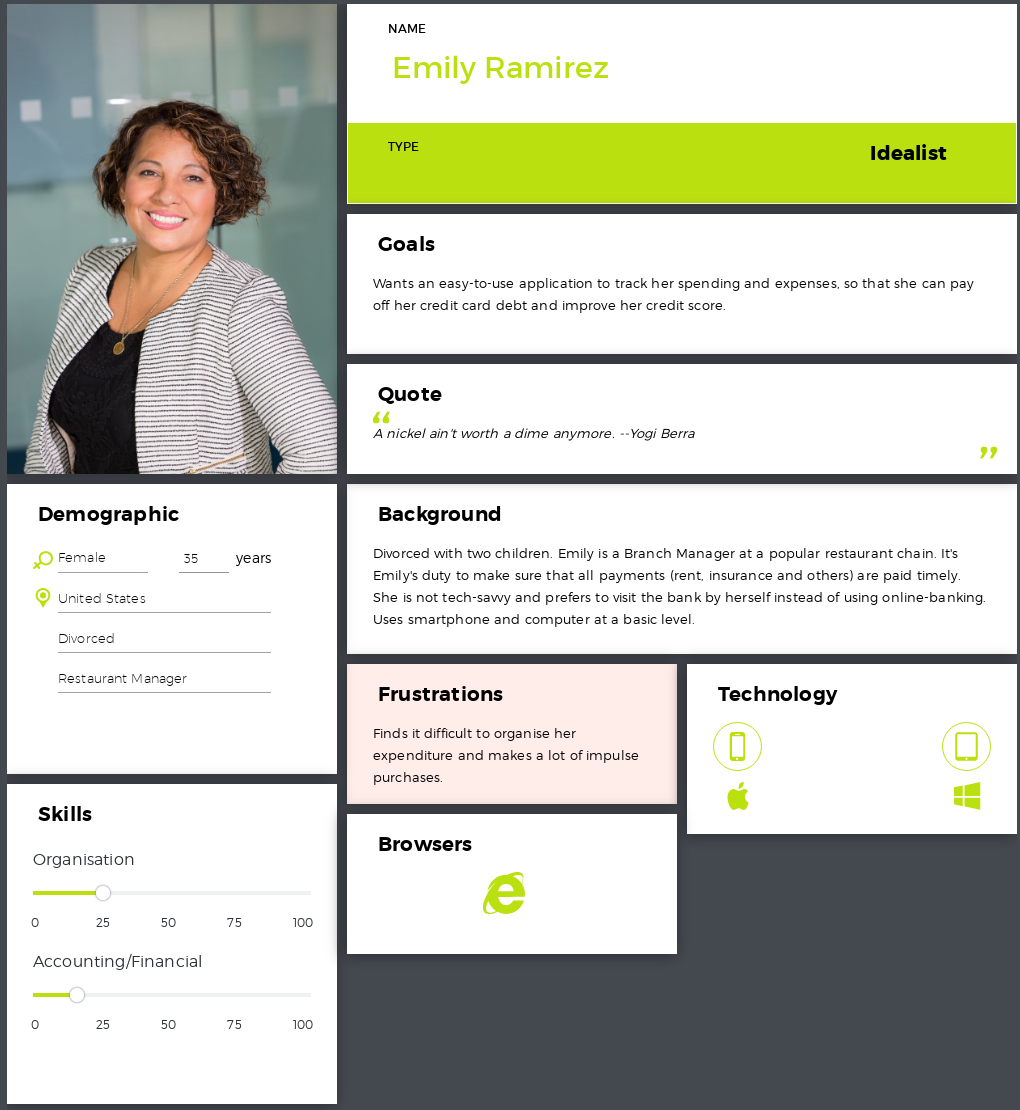
For instance, “Felix” represents a user group — young adults adapting to professional life — looking for an app helping them budget properly. With this user group, we see how our app helps these users in their day-to-day activities. For context, Felix loves traveling and with this app he can track his expenditure and prioritize his expenses and save money for traveling. On the other hand, “Emily” represents the middle-aged group, she is divorced and has two young children. She is not tech-savvy and needs something that is easy to use that will help her with budgeting, and eventually paying off those credit card debts. Both users can use our application for their needs pretty effectively.
Design Solutions
For this blog, we decided to provide two design solutions that adhere to two different user stories.
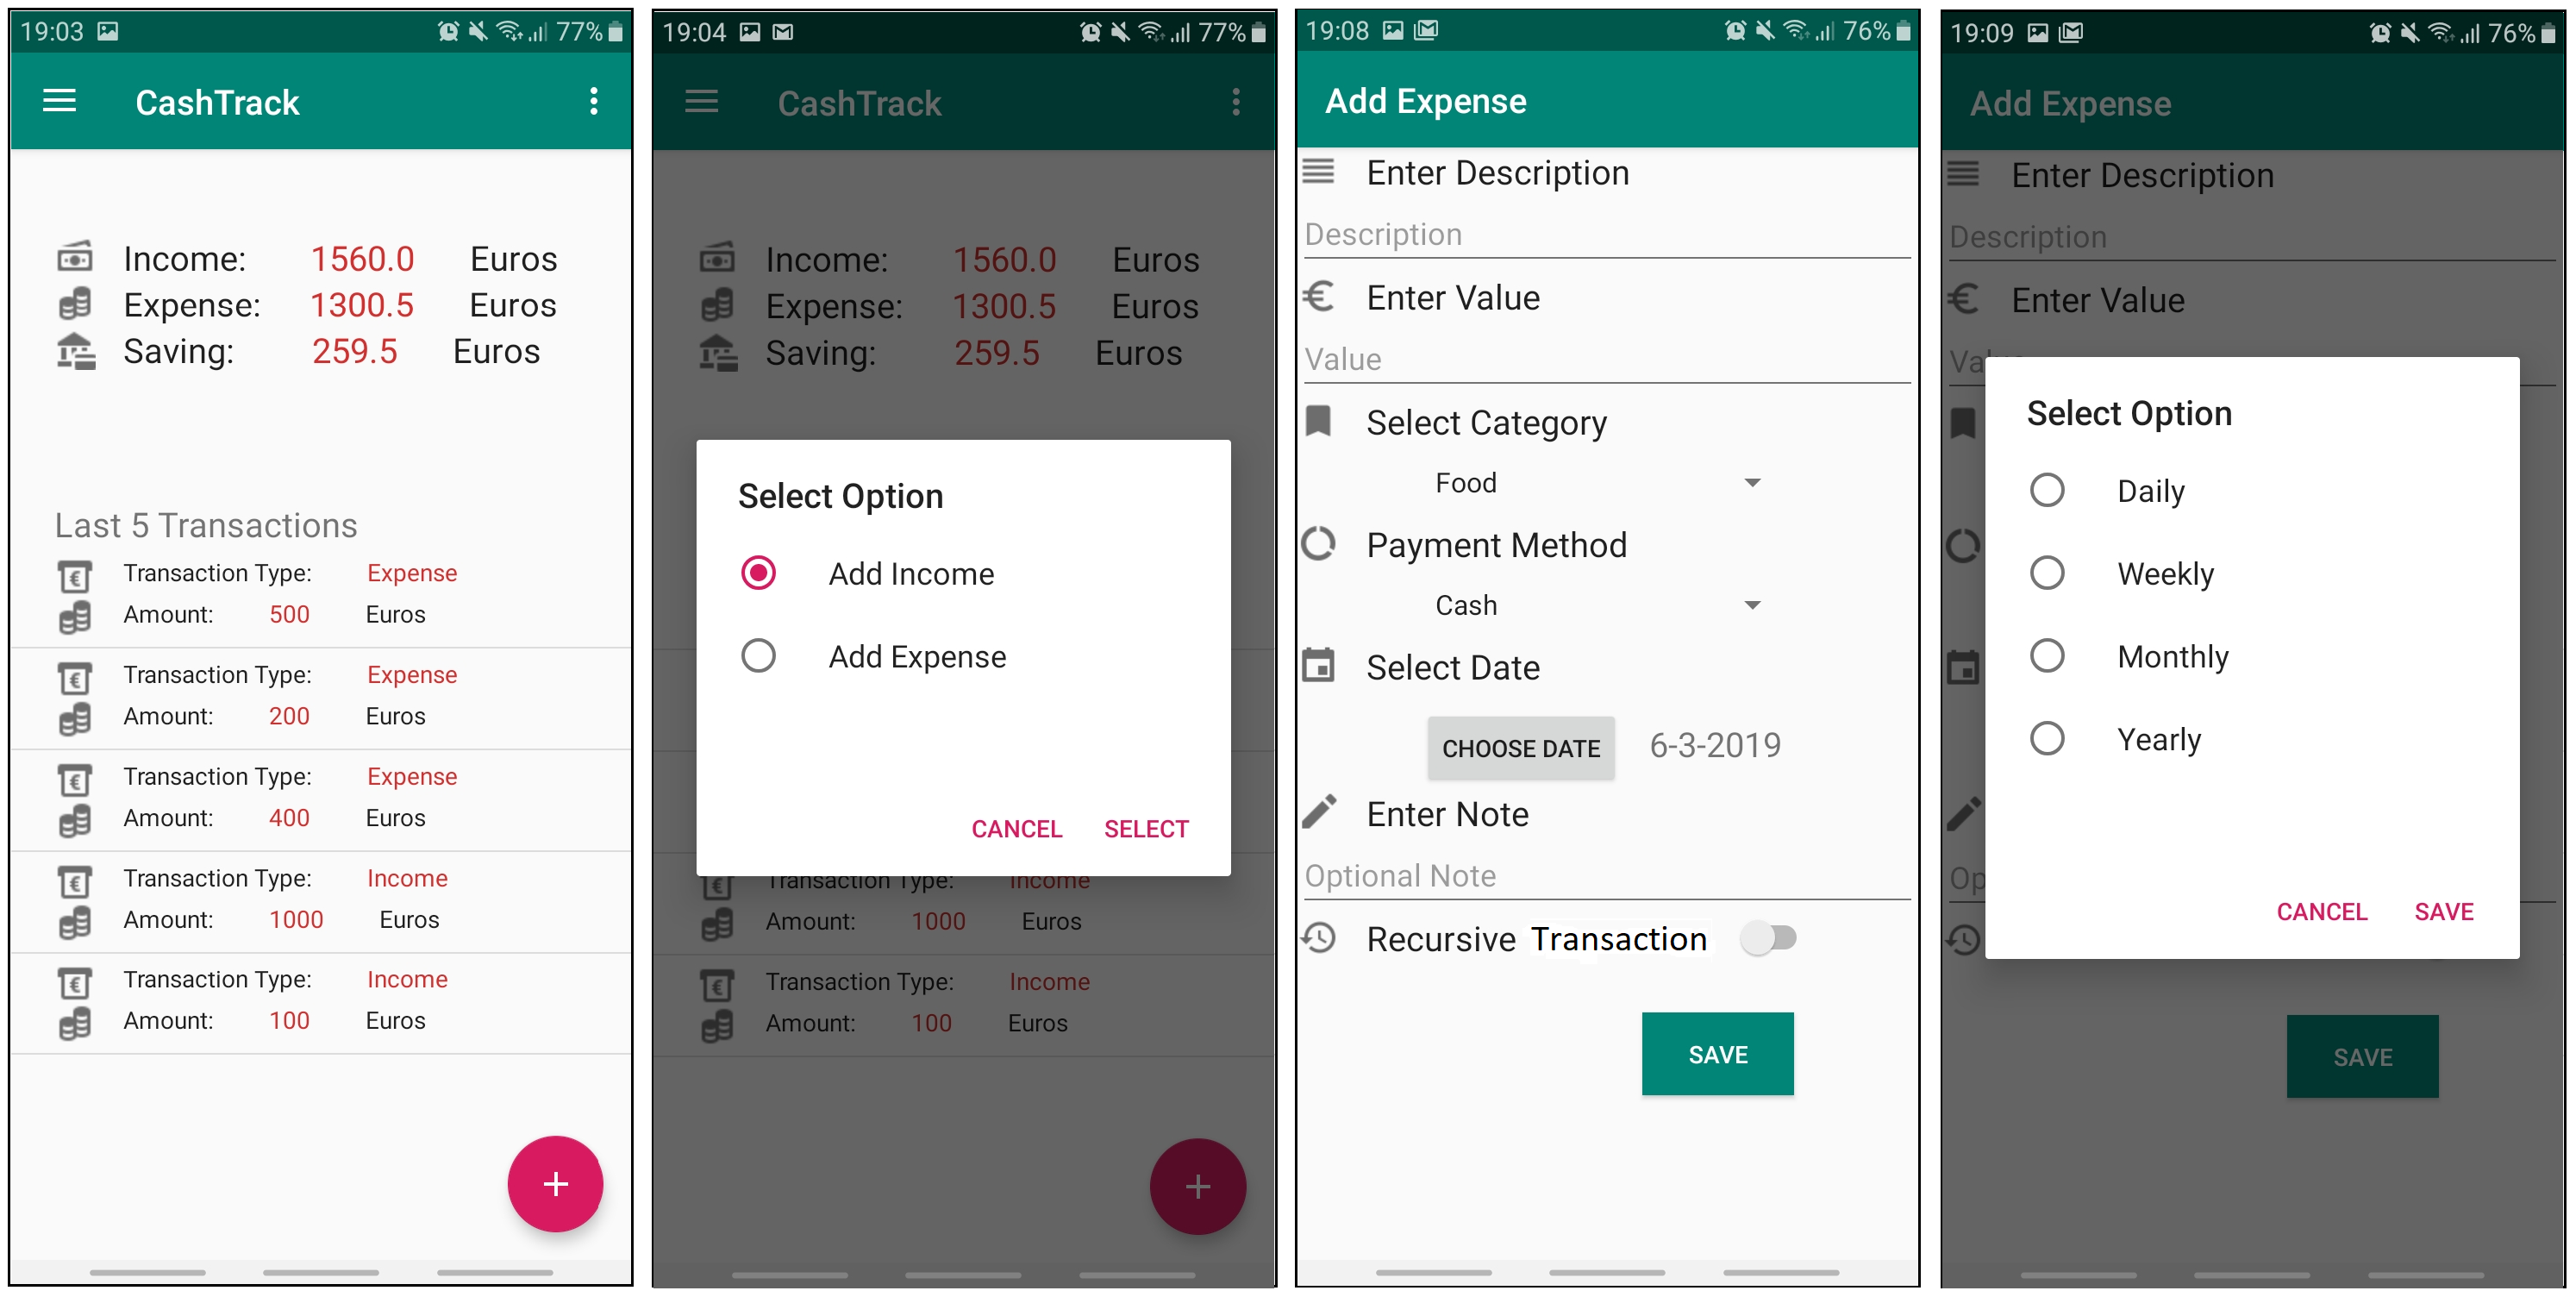
1. Adding a Recurring Expense: We designed a very simple and easy to navigate solution when it comes to adding reccuring expense. From the Main Screen users can click on the Add button. From here they can simply press the Switch in front of Recurring Transaction. This brings up a dialog that prompts the user for the time interval for the transaction, e.g. Mobile Bill on first date of every month.
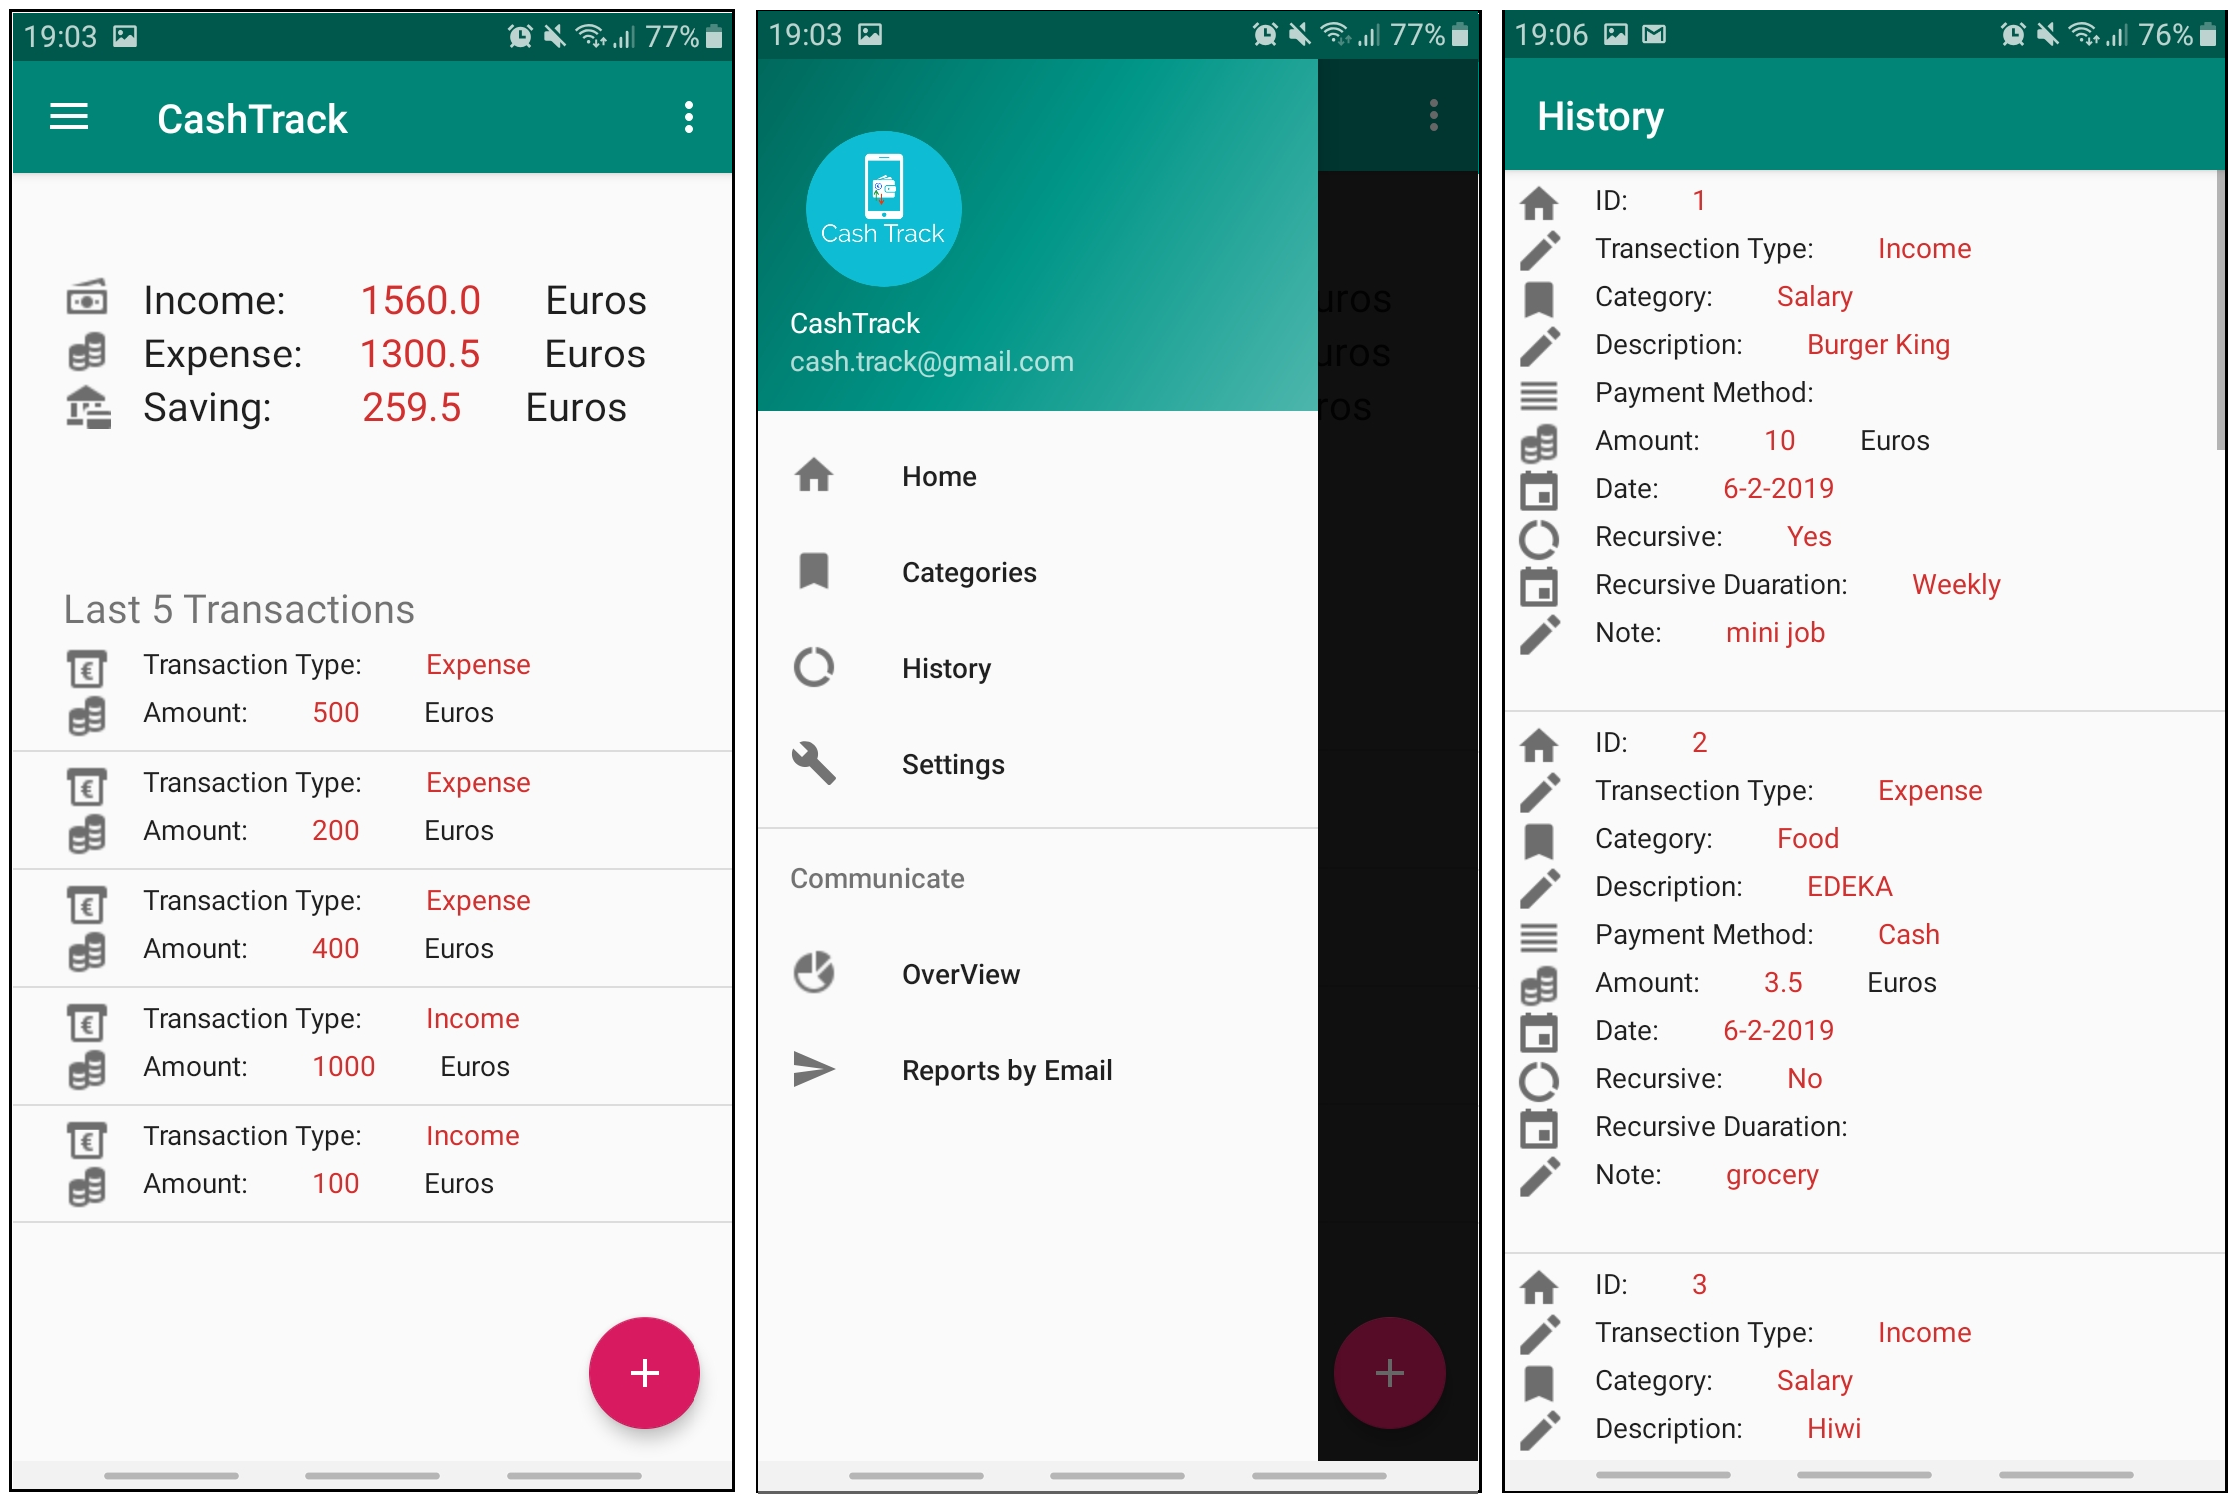
2. Checking the Complete Expense/Income History: We designed a very simple and easy to navigate solution when it comes to checking user’s complete transaction history. From the Main Screen users can click on the Toolbar button on the upper left corner. From there the navigation pan opens where there is an option for History which the users can click. The user is then promptly taken to another screen with their complete history. This option will be further strengthened with a search function in the upcoming weeks and will be implemented in the beta prototype.
Summary of Changes
In comparison with the basic prototype, we made many changes to the user interface.
-
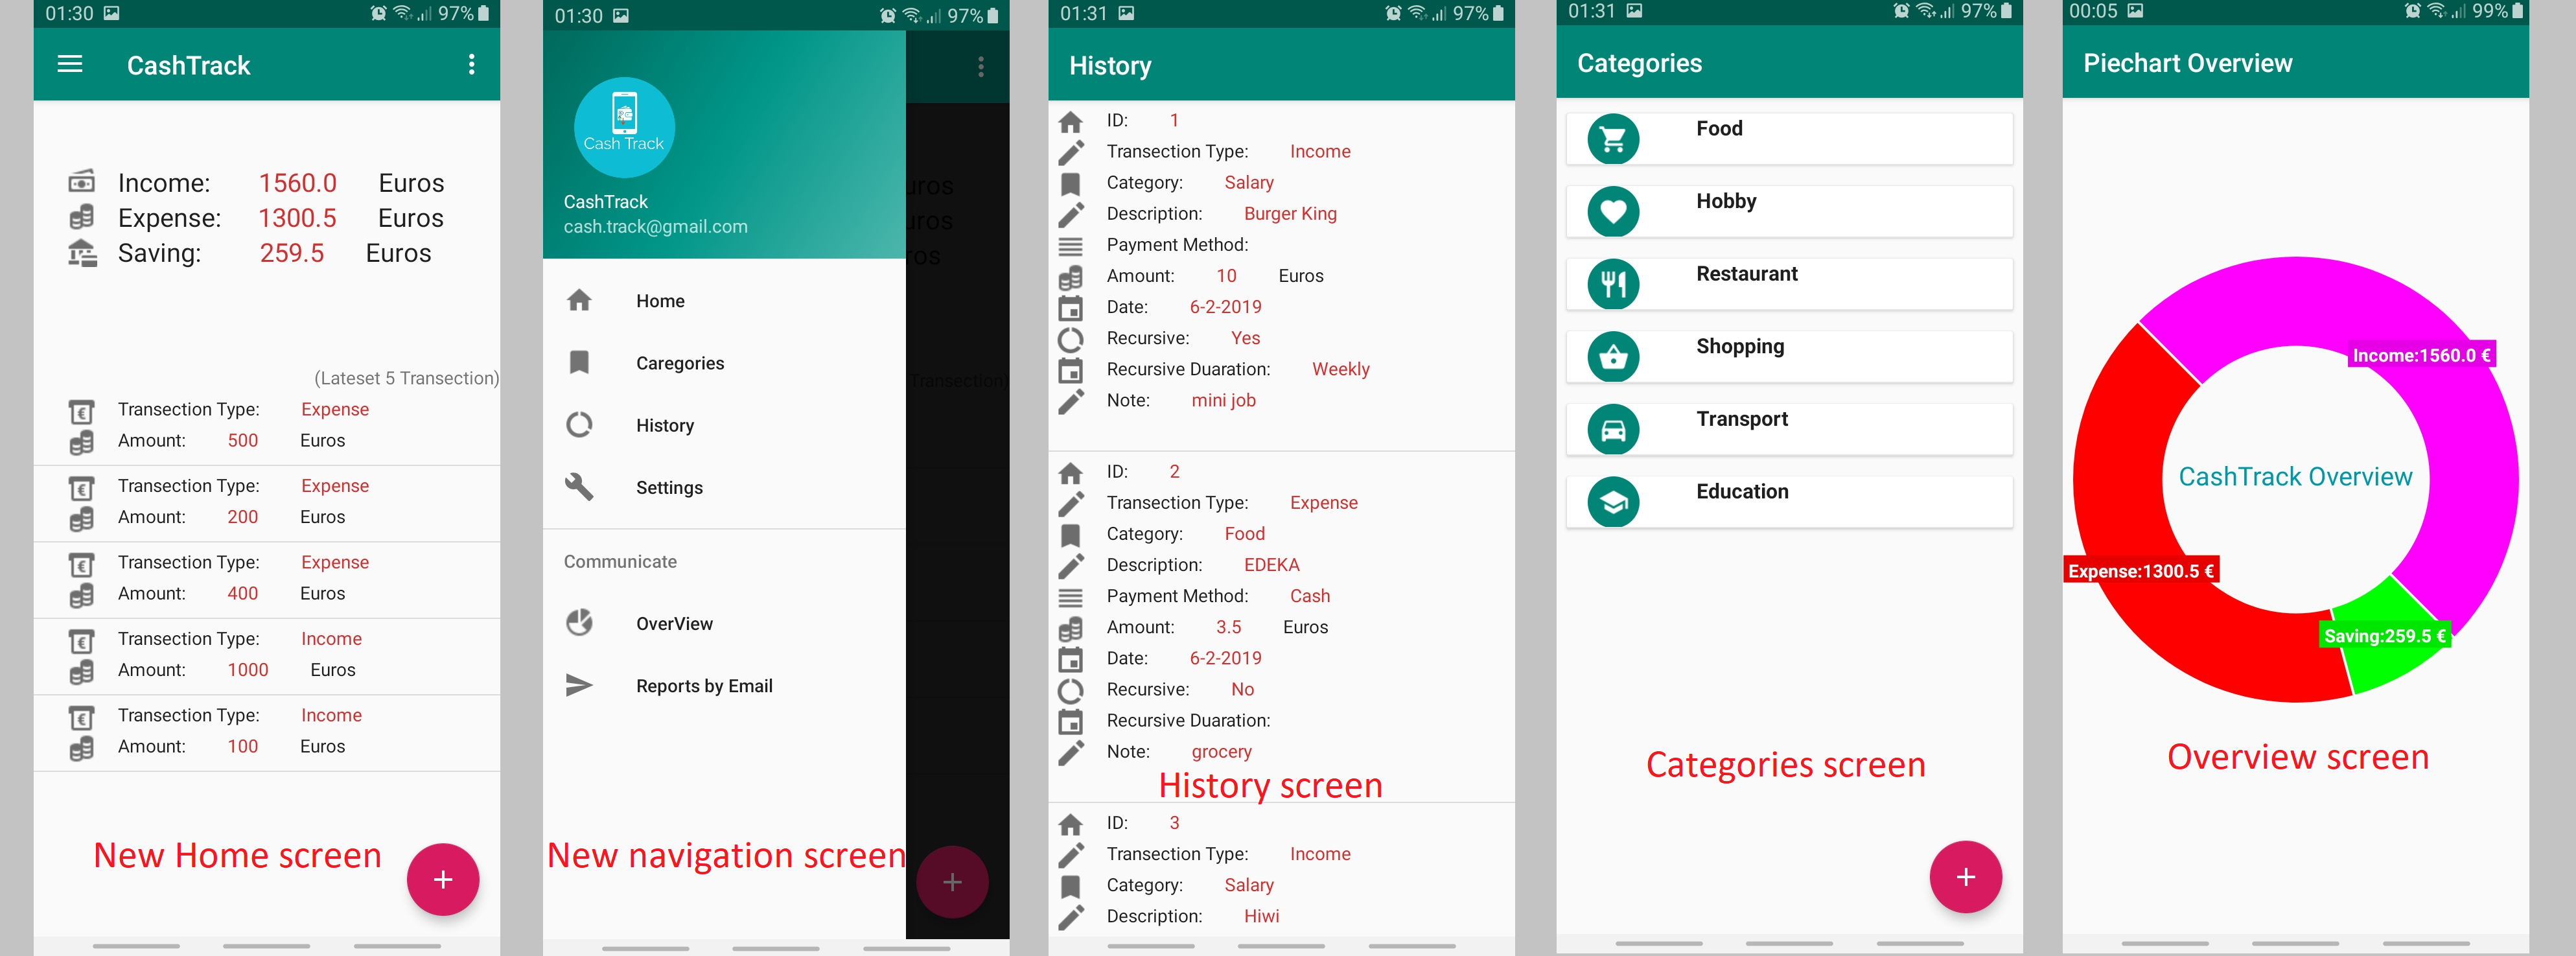
After the basic prototype milestone, we focused on the system User Interface design because it is the most important aspect of the application which will satisfy certain functional, psychological and aesthetic criteria. There has been a complete overhaul of the GUI all the way from Unlock Screen to Adding Expense/Income Screen to viewing Reports. We added an easy navigation bar, changed the colour scheme and made a different home page.
-
Previously, the the homepage just consisted of income, expense, and the graphical representation, now we have the last five transactions and the overall summary of income, expense and savings.
-
Now we have overview option, in which we can get overviews sorted by income, expenses or both.
-
Now we have the option to check the complete transaction history.
-
Added a functionality to create, delete and edit categories.
-
Added a PIN Unlock screen when the app initializes.
Working Prototype
The advanced prototype can be download from here.
Apart from all this, we leave you with some screenshots for the home screen, navigation tab, history screen, category screen and overview screen respectively, below.
In the coming weeks we will mainly be working on improving the GUI and finally, the beta prototype. Stay tuned.

