System Design
System Design
Until now we had user stories for the project which are approved by the customer. It’s time for us to design the software system that we will build it in the future.
1. Behaviour/Interaction Diagram
We have almost 32 user stories to be implemented in the order of their priority but we realized that 5 user stories are the most core features (rest of them are almost closer to additional features). So for that reason we will cover only these 5 user stories for behaviour diagrams. These user stories are as follows:
- As a trackable user I want to send alert to tracking user so that he can track me just before start of my journey.
- As a trackable user I want to select a contact from my contacts so that my contact can track me.
- As a trackable user I should be alerted when I am not moving from same destination for very long time.
- As a trackable user I should send notification to my tracking user if I am in same location for very long and didn’t responded to alert from app.
- As a trackable user I should send notification to tracking user when I reach home.
Notations used in following diagrams are
- Trackable user - Followee
- Tracking user - Follower
1.1 Creating new Tracking session Activity Diagram
![]() This activity diagram captures above user stories 1 and 2.
This activity diagram captures above user stories 1 and 2.
Create journey details : Followee will enter all his details like destination, estimated time to reach before the start of journey.
Select contact to follow : Once journey details are entered, he will select a contact requesting follower to track him.
Send request to contact to follow : All the journey details and request will be sent to the selected contact person through firebase backend server.
Received request to track : Follower gets a notification from followee requesting to track him.
Accepted : When accepted it will add new followee to the list of trackings and also sends message to followee that his request has been accepted and new tracking session is created.
Rejected : Send the message to followee that his request has been rejected. Followee has to again select another contact from his contact list.
Keep sending location details to follower - Since follower has accepted his request. Now user will start his journey and keep sending his details to follower.
1.2 Sending SOS signal to follower due to inactivity Activity Diagram
 This activity diagram captures above user stories 3 and 4.
When user is at same location - This will happen when app detects that user’s location is not changing for x minutes during the journey.
Alert user about the inactivity - App will alert the user asking him if he is all right. This alert will only stay for few seconds.
User responds - When user responds to the app then nothing will happen and journey will proceed as usual.
User doesn’t respond - When user won’t respond to the app then it will send SOS signal to follower through firebase server.
Received SOS - Follower will receive SOS with additional details like “last been location”, “minutes in that location”.
Ask follower to make a call - App once shown with details of SOS, it will ask follower whether he want to make a phone call to followee.
1.3 Interaction diagram when followee reached the destination
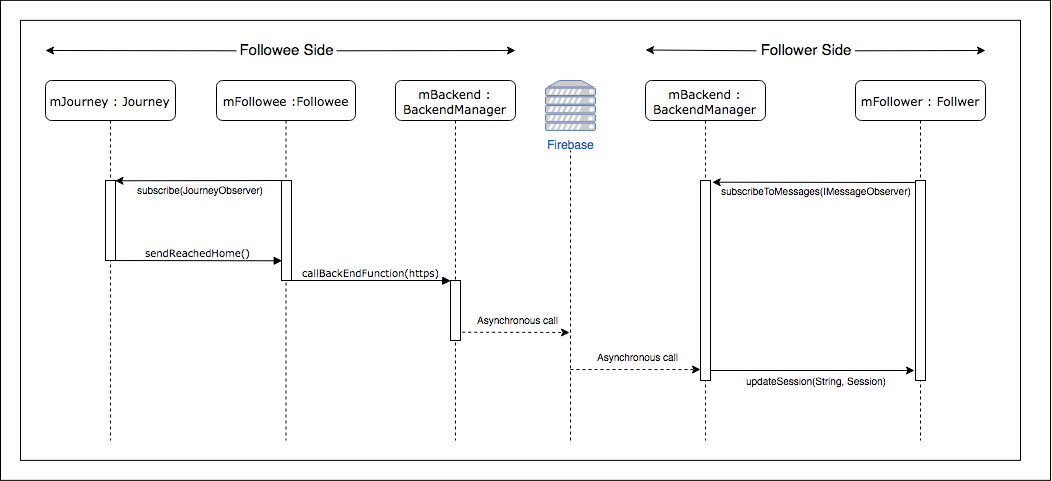 This interaction diagram captures above user story 5.
The class types Journey, Followee, BackendManager, Follower, Session are discussed in more detail in next section (Class Diagram section). We now just focus on how these objects interact with each other once followee reaches home.
mFolloweewill subscribe tomJourneyobject at the beginning of the app to listen to all interesting changes in the journey details. (More on observer pattern in Design patterns section)mFollowerwill subscribe tomBackendobject at the beginning of the app to alert itself when there is any incoming message from backend server.mJourneywill notify it’s observers that destination has been reached.mFolloweewill also get notified which in turn will make methodsendReachedHome()method get called.- Now
mFolloweewill invokecallBackEndFunction(https)ofmBackendobject. The arguments will contain https link which is responsible for sending notification to follower. mBackendobject will call the server asynchronously with provided link.- At the backend when appropriate https link is called it will trigger server’s logic to send push notification to target follower with additional information(i.e reached home)
- Now at follower side
mBackendobject notify about incoming message. mFollower get’s notified with message and updates the session of the followee withupdateSession(String, Session)function.
2. Class Diagram
This section contains only classes which are the core functionality of the app but not classes like Button, Activity(Details about them can be found here)
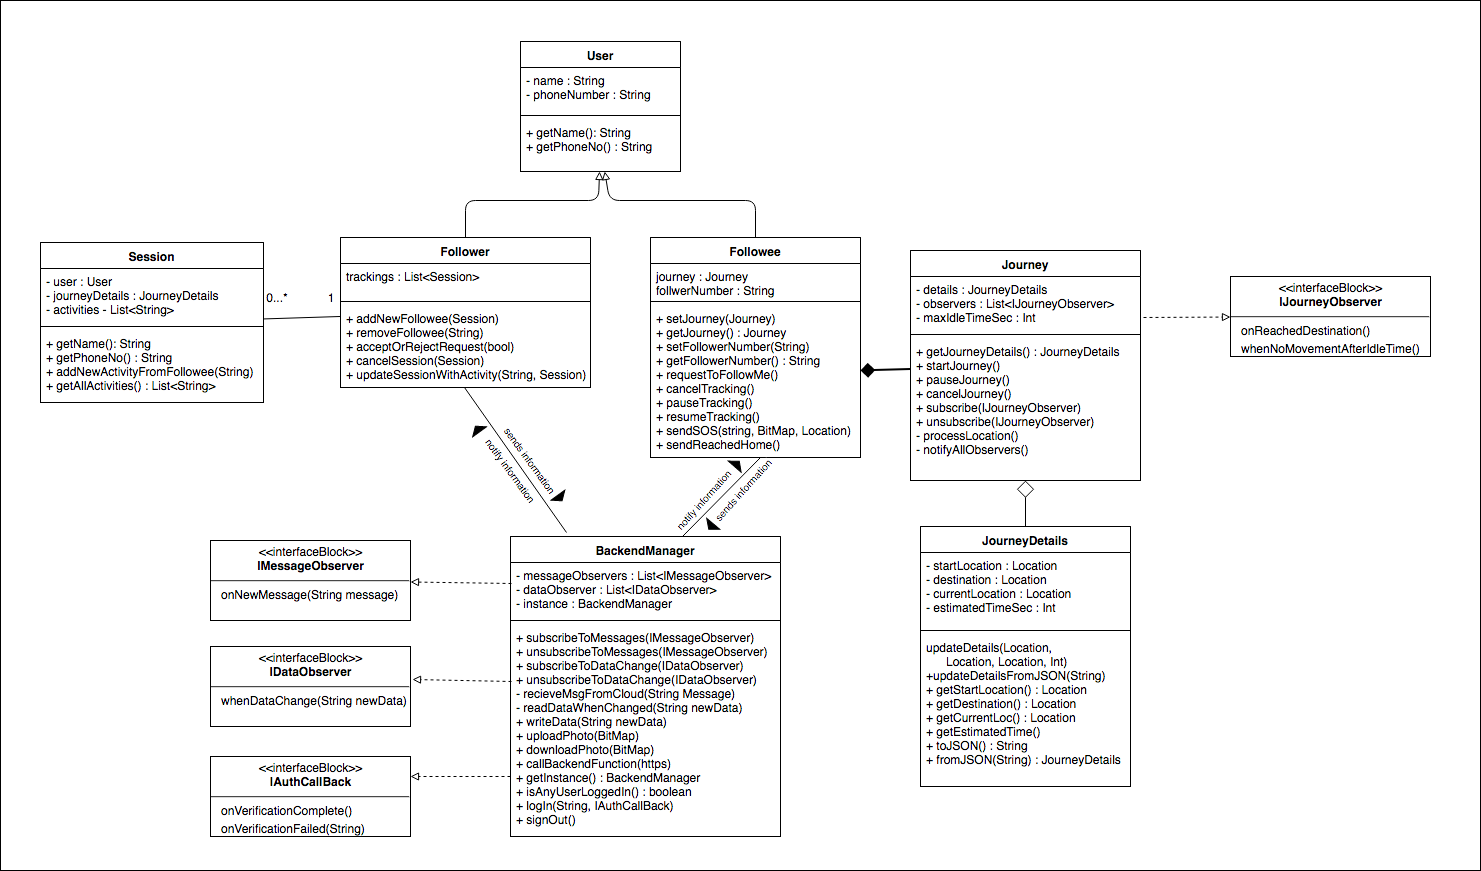
User - This class represents any user who is using the app. Mostly instance of this is used as data structure to communicate between Follower and Followee to know about each other.
- Attributes:-
name:String- This represents the name of the user.phoneNumber:String- This represents the phone number of the user.
- Methods:-
Both methodsgetName()andgetPhoneNo()acts as getter fornameandphoneNumber.
Followee - This class represents the user who is being tracked by Follower. Every application has at most one instance of this type.
- Attributes:-
journey:Journey- This holds reference to journey object.followerNumber:String- This has follower’s phone number as string.
- Methods:-
setJourney(Journey)andgetJourney()acts as setter and getter forjourneyvariable.setFollowerNumber(String)andgetFollowerNumber()acts as setter and getter forfollowerNumber.requestToFollowMe()- It will send details along with request to follower’s number to track this user.cancelTracking()- This is usually called when followee decides to cancel the session. It will setjourneyto null and sends message to follower about cancel tracking.pauseTracking()- This will pause the journey and sends message to follower that journey has been paused.resumeTracking()- This will resume the paused journey(otherwise it will do nothing) and sends message to follower that journey is resumed.sendSOS(String, BitMap, Location)- This will send SOS alert to follower with all the details. First argument is string about the reason of SOS, second argument is BitMap type which has image and final argument Location type contains co-ordinates of the location of followee.sendReachedHome()- This will send message to follower that followee has reached home.
Follower - This class represents the user who is tracking others. Every application has at most one instance of this type.
- Attributes:-
trackings:List<Session>- Follower maintains record of his trackings in a list.
- Methods:-
addNewFollowee(Session)- Adds new session to the list.removeFollowee(String)- Removes a session from the list. Pass phone number as argument describing the user who has to be removed.acceptOrRejectRequest(boolean)- This function sends message to followee whether his request to follow is accepted or rejected. True means accepted, false means rejected.cancelSession(Session)- It will both removes session from the list and sends followee that follower has stopped tracking him. Pass session argument which has to be cancelled.updateSessionWithActivity(String, Session)- Follower will receive several messages from many number of users. Those messages has to be updated in a session. First parameter is the message of typeString. Second parameter isSessionwhich has to be updated.
Journey - This class contains details of the journey, runs background logic about location of user and time and continually updates itself. This class will access location of the device to update it’s location variables.
- Attributes:-
details:JourneyDetails- Holds reference to journey details objectobservers:List<IJourneyObservers>- Holds list of observers which are subscribed to this instancemaxIdleTimeSec:int- number of seconds in which followee is allowed to stay at one place
- Methods:-
getJourneyDetails():Journey- Acts as getter to details variablestartJourney()- It will start the ticking the time of the journey and keep updating the location.pauseJourney()- It will pause ticking the time of journey and stops accessing phone’s location temporarily.cancelJourney()- It will stop ticking the time of journey and stops accessing phone’s location and set details variable to null.subscribe(IJourneyObserver)- It will add object that has been passed as argument to the list of observers.unsubscribe(IJourneyObserver)- It will remove the object that has been passed as argument from the list of observers.processLocation()- This function handles the logic like “Is destination reached?”, “Is user idle at some location formaxIdleTimeSec” and also keeps updating locationnotifyAllObservers()- This function will notify all of the objects that are present in the list when home is reached or user is idle for more thatmaxIdleTimeSecseconds.
IJourneyObserver - This interface has to be implemented by other objects in order to subscribe to the events of Journey object
- Methods:-
onReachedDestination()- This will be called when followee reaches the destination.whenNoMovementAfterIdleTime()- This will be called when followee has not been moving from one location for very long time.
JourneyDetails - This class acts like a data container. The instance of this class is used just to transfer data between Follower and Followee. Journey object is usually responsible to update the variables of this class.
- Attributes:-
startLocation:Location- This represents location from which user has started the journey.(More on Location type. See here)destination:Location- This represents location that followee is supposed to reachcurrentLocation:Location- This represents location currently user is at.estimatedTimeSec:int- The amount of time it will take for the user to reach the destination from current location to destination.
- Methods:-
updateDetails(Location, Location, Location, int)- This function will update the details of the journey. First argument is to updatestartLocation, second argument to updatedestination, third to updatecurrentLocationand final argument is to updateestimatedTimeSec. Any of the first three arguments can be set to null if we don’t want to update respective attribute. Last parameter can be set to any negative number if you don’t want to updateestimatedTimeSec.updateDetailsFromJSON(String)- This function will update the details of the journey from the string. Since communication between the servers is usually through strings then this function is used to update directly through JSON stringgetStartLocation(),getDestination(),getCurrentLocation(),getEstimatedTime()all acts as getters to the respective variables of this class.toJSON():String- Since journey details has to be sent through server it has to be converted toString. This will return aStringwhich has data about the journey details.fromJSON(String):JourneyDetails- This is a static function which will create new instances out of valid json string otherwise it will return null.
Session - This class represents a tracking session which are tracked by follower. Usually instances of this class is referenced by Follower since he maintains record of all his trackings as Session type.
- Attributes:-
user:User- Holds a reference to a user who is usually a followeejourneyDetails:JourneyDetails- Contains data about journey details of above variable’s user.activities:List<String>- Contains list of activities that followee has done. Eg :- Pausing, resuming, reaching home, etc..
- Methods:-
getName():String- It will return name of the user inuservariable.getPhoneNo():String- It will return phone number of the user.addNewActivityFromFollowee(String)- This will update the activities done by the usergetAllActivities():List<String>- This will returnactivitiesvariable.
BackendManager - This class is responsible for sending and receiving messages from backend. Followee and Follower classes use this class instance to communicate with each other. This class is capable of authenticating, sending files for cloud storage, write data and read data from real time database.
- Attributes:-
instance:BackendManager- This class only has one instance(More on singleton pattern in Design patterns section).messageObservers:List<IMessageObserver>- It contains list of observers who will be notified when there is any incoming message from backend server.dataObservers:List<IDataObserver>- It contains list of observers who will notified where there is a change in real time database.
- Methods:-
getInstance():BackendManager- This will returninstancevariable.subscribeToMessages(IMessageObserver)- This function will add objects to messageObservers list. These objects should implementIMessageObserverinterface and passed as argument to this function.unsubscribeToMessages(IMessageObserver)- This function will remove object from messageObservers list and they won’t be notified about incoming messages from server.subscribeToDataChange(IDataObserver)- This function will add object to dataObserver list. The object should implementIDataObserverinterface and passed as argument in this function.receiveMsgFromCloud(String)- This function will process the messages that came from the server. It may also notify all the objects inmessageObserverslist about a message.readDataWhenChanged(String)- This function will process when there is a change in data in real time database. It may also notify all the objects indataObserverslist.writeData(String)- This function will write data to server. Argument passed will be the new data in the server.uploadPhoto(BitMap)- This function will upload a photo to server’s storage. Argument passed is the photo to be uploaded.downloadPhoto(UrlRequest)- This function will download the photo present at the the URLRequest that is passed as argument.callBackendFunction(URLRequest)- This function will trigger backend to execute a function like making push notification, etc. Argument passed is the URLRequest to be called for a particular backend function.isAnyUserLoggedIn():boolean- This function will return true if user is already logged in otherwise false.logIn(String, IAuthCallBack)- This function will try to login the user using first argument phone number asStringand responds the login result withIAuthCallBackobject which is passed as second argumentsignOut()- This function will sign out already logged in user.
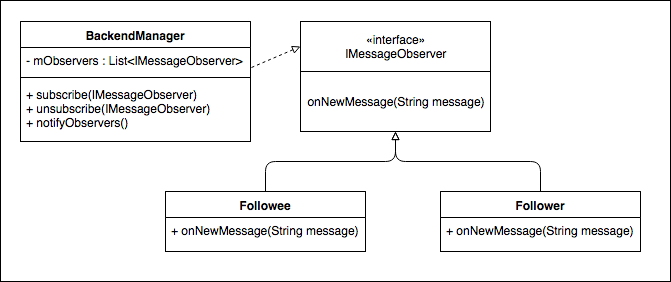
IMessageObserver - This interface has to be implemented by objects to get notified and receive messages from backend server.
- Methods:-
onNewMessage(String)- This will be called whenever there is a message from the server and that message will be passed asStringas arguments.
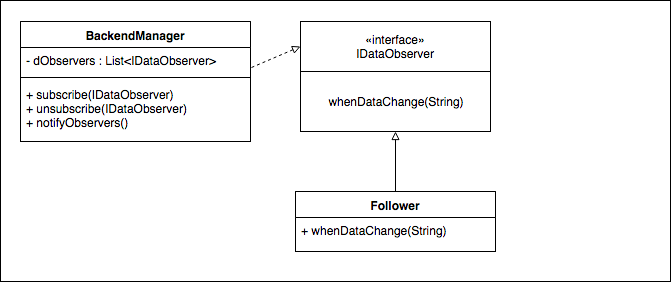
IDataObserver - This interface has to be implemented by objects to get notified whenever there is change in data at the backend server. Usually Follower will implement to get notified whenever there is change in location data of the Followee.
- Methods:-
- whenDataChange(String) - This will be called whenever there is new updated data in the server and the new data is passed as
Stringas arguments.
- whenDataChange(String) - This will be called whenever there is new updated data in the server and the new data is passed as
IAuthCallBack - This interface has to be implemented by objects to know the result of the login process.
- Methods:-
- onVerificationComplete() - This is called when login process is successful
- onVerificationFailed(String) - This will be called when login process is failed and the reason for login failure is sent as argument.
- onVerificationComplete() - This is called when login process is successful
3. Design Patterns
We are utilizing three design patterns in our project:
3.1 MVC pattern
Model View Controller is more of a architecture pattern than design pattern. We will still discuss about it on how we have divided our classes into Model, View and controller layer.
Model Layer - All the classes that are discussed in previous section will fall under model layer. They have all the core functionalities of the app within them and how data is stored and managed.
Controller Layer - These classes will manages the interaction between the user’s UI(View) and the model layer. In our software these classes usually extend Activity or Fragment class which are provided by android library. Some of the classes are as follows:
LoginActivity- This class will control user view to receive login credentials from user. These details will be sent to model layer(i.eBackendManagerclass). Once the model layer processes the login request this class will update View layer with user details.JourneyActivity- This class will control user’s ui which shows journey details and in the background model layer(ie.Followeeclass) will keep updating the journey details. This class will keep both user’s UI and model data in sync.MyTrackingsActivity- This class will control follower’s ui with all the model data about his trackings(i.eFollower,Sessionclasses). When there is any update from backend server model layer will update from it which in turn will update UI view by this class.
View Layer - Mostly these classes are not written by us unless if we want a custom UI. They are already provided by android libraries. Information about them can be found here.

3.2 Singleton Pattern
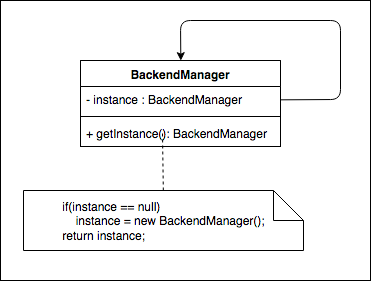
We have used singleton pattern for BackendManager class. Having multiple instances of this class to call backend server will lead to accessing internet resources of the device multiple times. It will also lead to losing track of messages when server responds with new message. Instead all the objects which are interested in backend server will interact with just one instance and this instance will send and receive messages from server.
3.3 Observer Pattern
This design pattern has been used at two places in our system design. One at Journey class and another at BackendManager class.
Journey- This class instance will always be updating data about location and time left for the journey. It is important for other objects to know about these important updates. For this they will subscribe to theJourneyobject by implementing theIJourneyObserverinterface. In returnJourneyobject will notify them when there is something interesting happens in journey(like reached home).
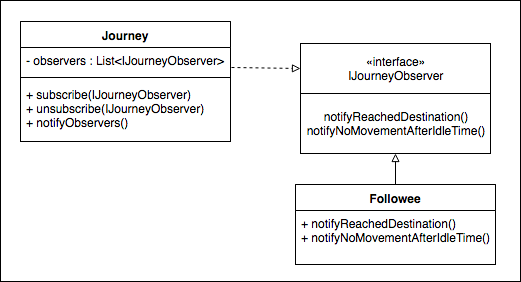
BackendManager- This class receives messages from server and objects which are interested in those messages needed to be notified when there is a new message. For this other objects needed to subscribe to this class. There are two kinds of notification that this class can do. First, when there is message from other user (Followeesending message toFolloweror vice versa). Secondly, when there is a change in data in real time database (whenFolloweekeeps updating his data about his location). For this reason there are two interfaces(IDataObserver,IMessageObserver) where each serve one of the above two purposes.
4. Development Strategy
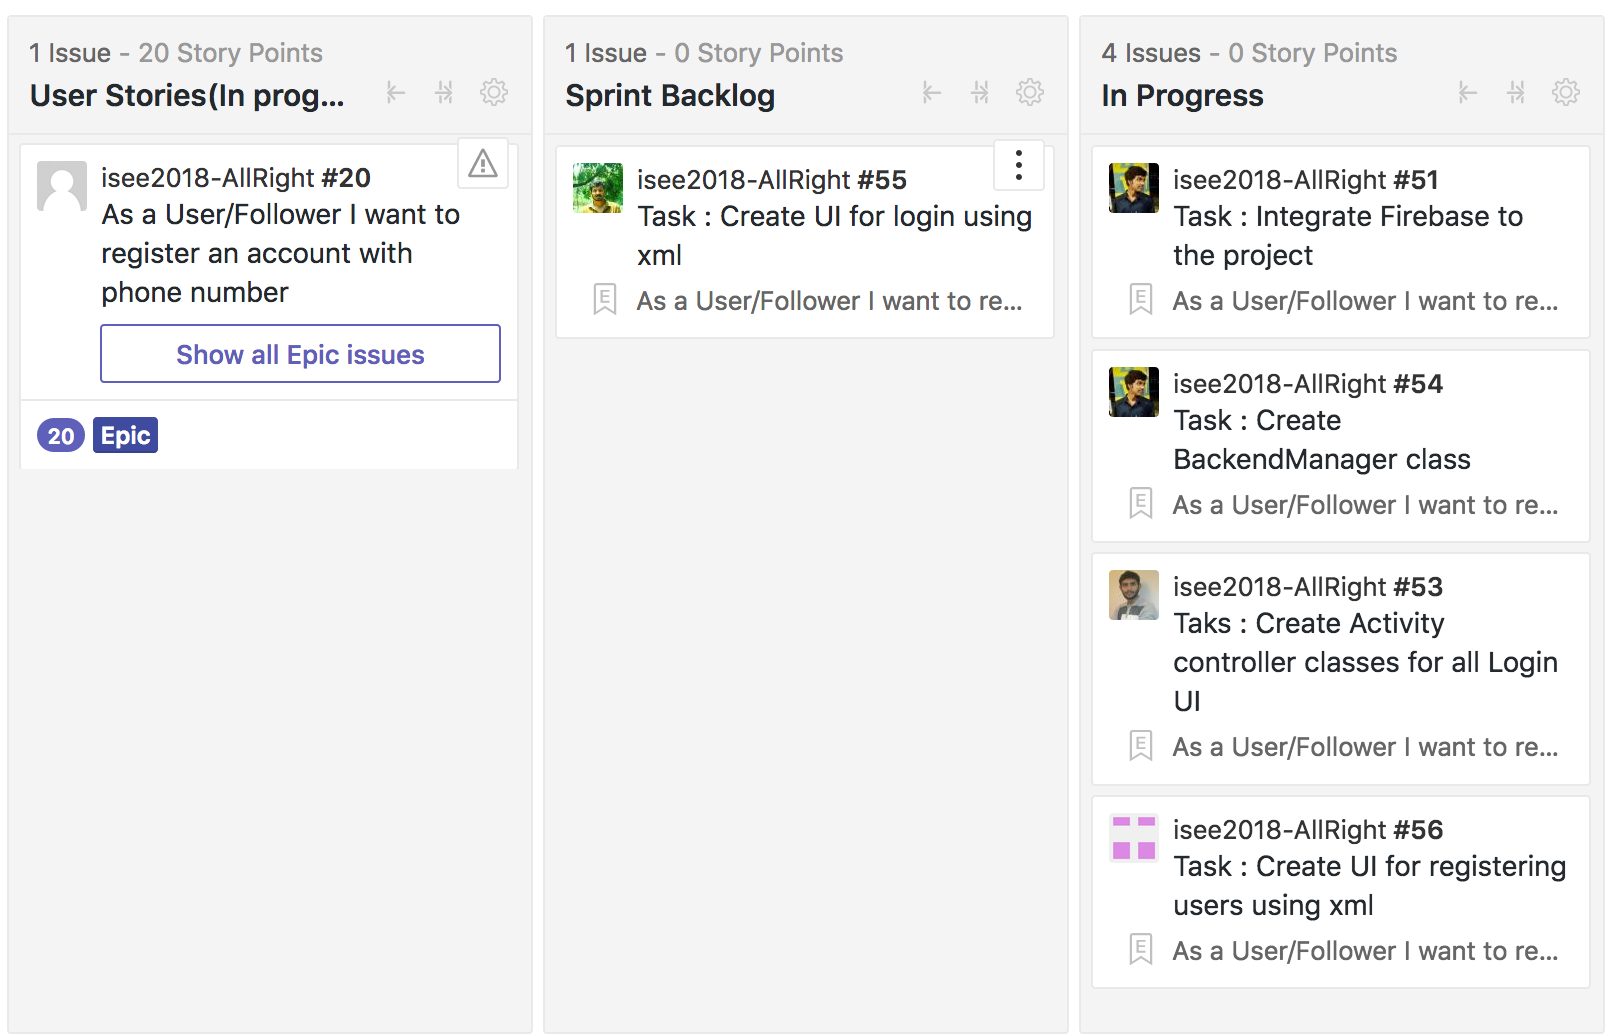
With system design in hand it’s time for us to get into programming. If you have been following our previous blog you know that our approach to this project development is by using SCRUM. In requirement analysis phase we estimated time required for each user story and priority of each user story to be developed. We stacked top user stories to be developed at front and then grouped them into several sets such that each set of user stories will have fixed development time(1 week).
During each sprint(each week) we will pick the top set and proceed for development. Each user story in the set will be further divided into tasks (Eg:- Create User class). All our team members will pick the tasks they want to work on and start developing.
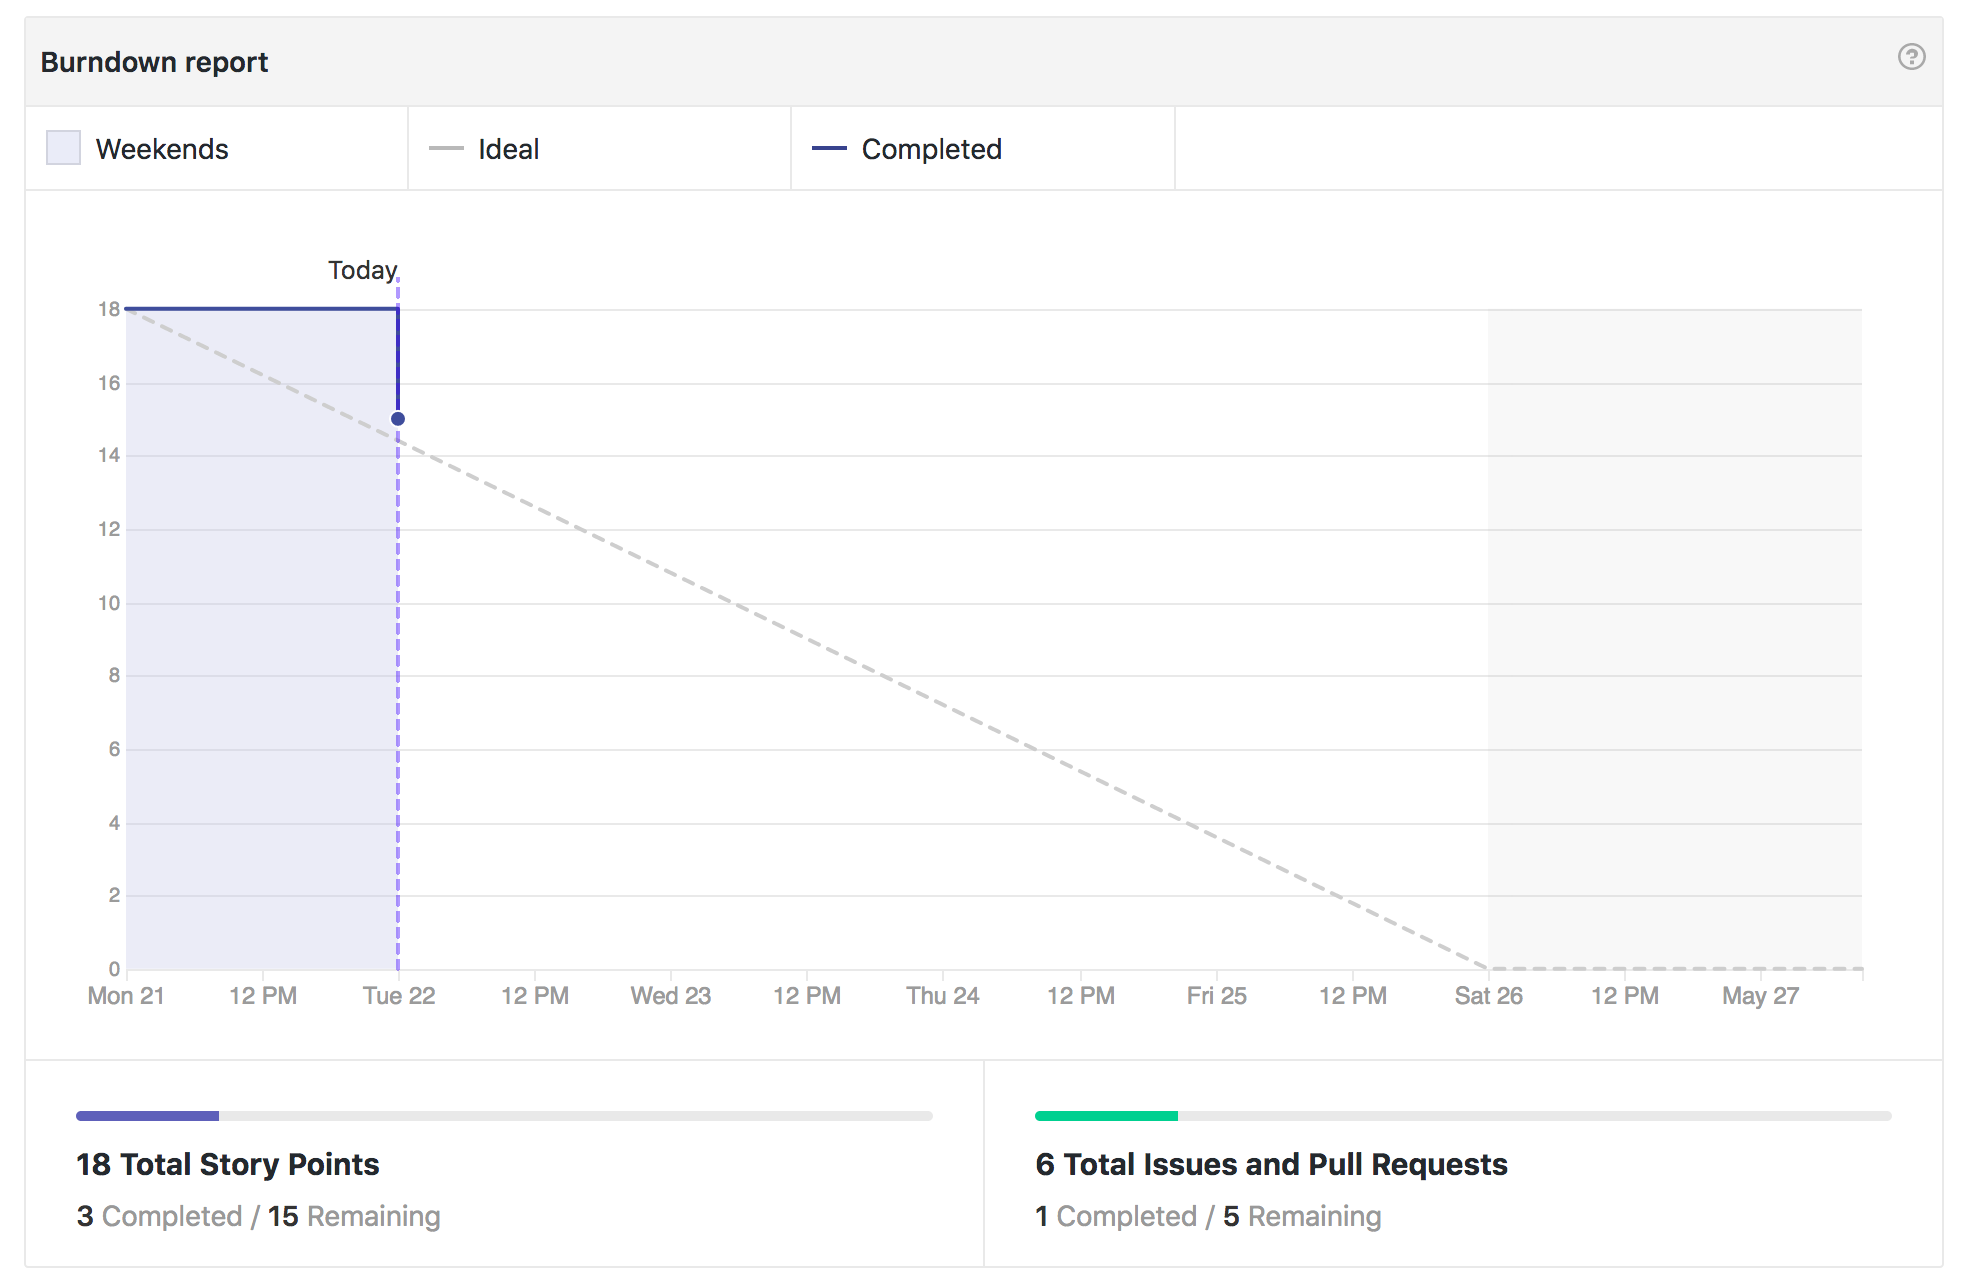
We also utilize burndown chart to see how well we are progressing in the project each week. Below picture is one of our sprint (May 21st - May 27th). This shows we are on time and can finish our sprint one day before the deadline of sprint.
5. Summary of Changes
From the time when the customer approved the requirements we gathered till the time of this blog writing, we didn’t faced any new or modified requirements. If in the future there are any new requirements or modification of old requirements are necessary from the customer then we will try to integrate them into our system design.
Thank you for reading this blog. See you again in next blog!
Subscribe to All Right
Get the latest posts delivered right to your inbox